Zaštite Windows kredencijala
Tip
Učite i vežbajte AWS Hacking:
HackTricks Training AWS Red Team Expert (ARTE)
Učite i vežbajte GCP Hacking:HackTricks Training GCP Red Team Expert (GRTE)
Učite i vežbajte Azure Hacking:
HackTricks Training Azure Red Team Expert (AzRTE)
Podržite HackTricks
- Proverite planove pretplate!
- Pridružite se 💬 Discord grupi ili telegram grupi ili pratite nas na Twitteru 🐦 @hacktricks_live.
- Podelite hakerske trikove slanjem PR-ova na HackTricks i HackTricks Cloud github repozitorijume.
WDigest
The WDigest protocol, introduced with Windows XP, is designed for authentication via the HTTP Protocol and is enabled by default on Windows XP through Windows 8.0 and Windows Server 2003 to Windows Server 2012. This default setting results in plain-text password storage in LSASS (Local Security Authority Subsystem Service). Napadač može koristiti Mimikatz da izvuče ove kredencijale izvršavanjem:
sekurlsa::wdigest
Da biste isključili ili uključili ovu funkciju, UseLogonCredential i Negotiate ključevi registra unutar HKEY_LOCAL_MACHINE\System\CurrentControlSet\Control\SecurityProviders\WDigest moraju biti postavljeni na “1”. Ako ovi ključevi nedostaju ili su postavljeni na “0”, WDigest je onemogućen:
reg query HKLM\SYSTEM\CurrentControlSet\Control\SecurityProviders\WDigest /v UseLogonCredential
Zaštita LSA (PP i PPL zaštićeni procesi)
Protected Process (PP) i Protected Process Light (PPL) su Windows zaštite na nivou kernela dizajnirane da spreče neovlašćeni pristup osetljivim procesima kao što je LSASS. Uveden u Windows Vista, PP model je prvobitno napravljen za DRM i omogućavao je zaštitu samo binarnim fajlovima potpisanim posebnim medija sertifikatom. Proces označen kao PP može se pristupiti samo od strane drugih procesa koji su takođe PP i imaju jednak ili viši nivo zaštite, i čak tada, samo sa ograničenim pristupnim pravima osim ako nije posebno dozvoljeno.
PPL, uveden u Windows 8.1, predstavlja fleksibilniju verziju PP. Omogućava šire slučajeve upotrebe (npr. LSASS, Defender) uvodeći “protection levels” zasnovane na polju digitalnog potpisa EKU (Enhanced Key Usage). Nivo zaštite se čuva u polju EPROCESS.Protection, koje je PS_PROTECTION struktura sa:
- Type (
ProtectedorProtectedLight) - Signer (npr.
WinTcb,Lsa,Antimalware, itd.)
Ova struktura je upakovana u jedan bajt i određuje ko kome može pristupiti:
- Više signer vrednosti mogu pristupati nižim
- PPL ne mogu pristupati PP
- Nezaštićeni procesi ne mogu pristupiti nijednom PPL/PP
Šta treba da znate iz ofanzivne perspektive
- Kada LSASS radi kao PPL, pokušaji da se otvori korišćenjem
OpenProcess(PROCESS_VM_READ | QUERY_INFORMATION)iz običnog administratorskog konteksta ne uspevaju i vraćaju0x5 (Access Denied), čak i ako jeSeDebugPrivilegeomogućen. - Možete proveriti nivo zaštite LSASS-a koristeći alate poput Process Hacker ili programatski čitanjem vrednosti
EPROCESS.Protection. - LSASS obično ima
PsProtectedSignerLsa-Light(0x41), kojem mogu pristupiti samo procesi potpisani signerom višeg nivoa, kao što jeWinTcb(0x61ili0x62). - PPL je ograničenje samo u userland-u; kod na nivou kernela ga može u potpunosti zaobići.
- To što je LSASS PPL ne sprečava credential dumping ako možete izvršiti kernel shellcode ili iskoristiti visokoprivilegovani proces sa odgovarajućim pristupom.
- Podesavanje ili uklanjanje PPL zahteva restart ili Secure Boot/UEFI podešavanja, koja mogu sačuvati PPL podešavanje čak i nakon što su promene u registru poništene.
Create a PPL process at launch (documented API)
Windows pruža dokumentovan način da se zatraži Protected Process Light nivo za child process tokom kreiranja koristeći extended startup attribute list. Ovo ne zaobilazi zahteve za potpisivanjem — ciljna slika mora biti potpisana za traženu signer klasu.
Minimalan tok u C/C++:
// Request a PPL protection level for the child process at creation time
// Requires Windows 8.1+ and a properly signed image for the selected level
#include <windows.h>

int wmain(int argc, wchar_t **argv) {
STARTUPINFOEXW si = {0};
PROCESS_INFORMATION pi = {0};
si.StartupInfo.cb = sizeof(si);

SIZE_T attrSize = 0;
InitializeProcThreadAttributeList(NULL, 1, 0, &attrSize);
si.lpAttributeList = (PPROC_THREAD_ATTRIBUTE_LIST)HeapAlloc(GetProcessHeap(), 0, attrSize);
if (!si.lpAttributeList) return 1;

if (!InitializeProcThreadAttributeList(si.lpAttributeList, 1, 0, &attrSize)) return 1;

DWORD level = PROTECTION_LEVEL_ANTIMALWARE_LIGHT; // or WINDOWS_LIGHT/LSA_LIGHT/WINTCB_LIGHT
if (!UpdateProcThreadAttribute(
si.lpAttributeList, 0,
PROC_THREAD_ATTRIBUTE_PROTECTION_LEVEL,
&level, sizeof(level), NULL, NULL)) {
return 1;
}

DWORD flags = EXTENDED_STARTUPINFO_PRESENT;
if (!CreateProcessW(L"C\\Windows\\System32\\notepad.exe", NULL, NULL, NULL, FALSE,
flags, NULL, NULL, &si.StartupInfo, &pi)) {
// If the image isn't signed appropriately for the requested level,
// CreateProcess will fail with ERROR_INVALID_IMAGE_HASH (577).
return 1;
}

// cleanup
DeleteProcThreadAttributeList(si.lpAttributeList);
HeapFree(GetProcessHeap(), 0, si.lpAttributeList);
CloseHandle(pi.hThread);
CloseHandle(pi.hProcess);
return 0;
}
Napomene i ograničenja:
- Koristite
STARTUPINFOEXsaInitializeProcThreadAttributeListiUpdateProcThreadAttribute(PROC_THREAD_ATTRIBUTE_PROTECTION_LEVEL, ...), zatim proslediteEXTENDED_STARTUPINFO_PRESENTfunkcijamaCreateProcess*. - Zaštitni
DWORDmože biti postavljen na konstante kao što suPROTECTION_LEVEL_WINTCB_LIGHT,PROTECTION_LEVEL_WINDOWS,PROTECTION_LEVEL_WINDOWS_LIGHT,PROTECTION_LEVEL_ANTIMALWARE_LIGHT, iliPROTECTION_LEVEL_LSA_LIGHT. - Child proces počinje kao PPL samo ako je njegova image potpisana za tu signer klasu; u protivnom kreiranje procesa pada, obično sa
ERROR_INVALID_IMAGE_HASH (577)/STATUS_INVALID_IMAGE_HASH (0xC0000428). - Ovo nije bypass — to je podržani API namenjen odgovarajuće potpisanim image-ima. Korisno za ojačavanje alata ili validaciju PPL-zaštićenih konfiguracija.
Example CLI using a minimal loader:
- Antimalware signer:
CreateProcessAsPPL.exe 3 C:\Tools\agent.exe --svc - LSA-light signer:
CreateProcessAsPPL.exe 4 C:\Windows\System32\notepad.exe
Bypass PPL protections options:
Ako želite da dump-ujete LSASS uprkos PPL, imate 3 glavne opcije:
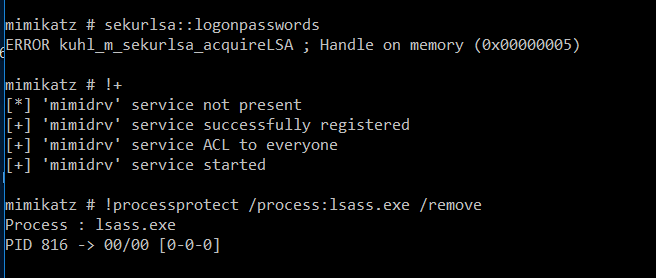
- Use a signed kernel driver (e.g., Mimikatz + mimidrv.sys) to remove LSASS’s protection flag:

- Bring Your Own Vulnerable Driver (BYOVD) to run custom kernel code and disable the protection. Tools like PPLKiller, gdrv-loader, or kdmapper make this feasible.
- Steal an existing LSASS handle from another process that has it open (e.g., an AV process), then duplicate it into your process. This is the basis of the
pypykatz live lsa --method handleduptechnique. - Abuse some privileged process that will allow you to load arbitrary code into its address space or inside another privileged process, effectively bypassing the PPL restrictions. You can check an example of this in bypassing-lsa-protection-in-userland or https://github.com/itm4n/PPLdump.
Check current status of LSA protection (PPL/PP) for LSASS:
reg query HKEY_LOCAL_MACHINE\SYSTEM\CurrentControlSet\Control\LSA /v RunAsPPL
Kada pokrenete mimikatz privilege::debug sekurlsa::logonpasswords verovatno će se završiti greškom sa kodom 0x00000005 zbog ovoga.
- Za više informacija o ovoj proveri https://itm4n.github.io/lsass-runasppl/
Credential Guard
Credential Guard, funkcija ekskluzivna za Windows 10 (Enterprise and Education editions), pojačava bezbednost mašinskih kredencijala koristeći Virtual Secure Mode (VSM) i Virtualization Based Security (VBS). Ona koristi CPU ekstenzije za virtualizaciju da izoluje ključne procese u zaštićenom prostoru memorije, van dometa glavnog operativnog sistema. Ova izolacija obezbeđuje da čak i kernel ne može pristupiti memoriji u VSM, efikasno štiteći kredencijale od napada poput pass-the-hash. Local Security Authority (LSA) radi u ovom sigurnom okruženju kao trustlet, dok proces LSASS u glavnom OS-u deluje samo kao posrednik koji komunicira sa LSA u VSM.
Po defaultu, Credential Guard nije aktiviran i zahteva ručnu aktivaciju u organizaciji. On je značajan za poboljšanje sigurnosti protiv alata poput Mimikatz, koji su ograničeni u mogućnosti izvlačenja kredencijala. Ipak, ranjivosti se i dalje mogu iskoristiti dodavanjem prilagođenih Security Support Providers (SSP) koji mogu uhvatiti kredencijale u čistom tekstu tokom pokušaja prijave.
Da biste proverili status aktivacije Credential Guard, možete pregledati registry ključ LsaCfgFlags pod HKLM\System\CurrentControlSet\Control\LSA. Vrednost “1” označava aktivaciju sa UEFI lock, “2” bez lock-a, a “0” označava da nije omogućeno. Ova provera u registry-u, iako dobar indikator, nije jedini korak za omogućavanje Credential Guard. Detaljna uputstva i PowerShell skripta za omogućavanje ove funkcije dostupni su online.
reg query HKLM\System\CurrentControlSet\Control\LSA /v LsaCfgFlags
For a comprehensive understanding and instructions on enabling Credential Guard in Windows 10 and its automatic activation in compatible systems of Windows 11 Enterprise and Education (version 22H2), visit Microsoft’s documentation.
Further details on implementing custom SSPs for credential capture are provided in this guide.
RDP RestrictedAdmin Mode
Windows 8.1 and Windows Server 2012 R2 introduced several new security features, including the Restricted Admin mode for RDP. This mode was designed to enhance security by mitigating the risks associated with pass the hash attacks.
Traditionally, when connecting to a remote computer via RDP, your credentials are stored on the target machine. This poses a significant security risk, especially when using accounts with elevated privileges. However, with the introduction of Restricted Admin mode, this risk is substantially reduced.
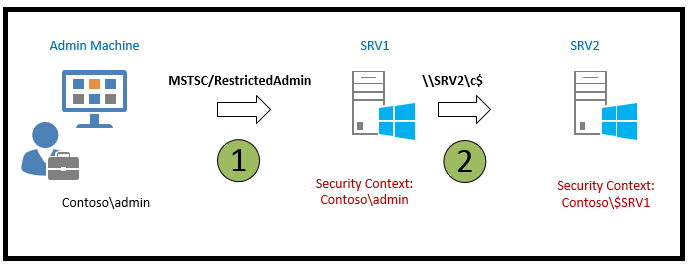
When initiating an RDP connection using the command mstsc.exe /RestrictedAdmin, authentication to the remote computer is performed without storing your credentials on it. This approach ensures that, in the event of a malware infection or if a malicious user gains access to the remote server, your credentials are not compromised, as they are not stored on the server.
It’s important to note that in Restricted Admin mode, attempts to access network resources from the RDP session will not use your personal credentials; instead, the machine’s identity is used.
This feature marks a significant step forward in securing remote desktop connections and protecting sensitive information from being exposed in case of a security breach.

For more detailed information on visit this resource.
Keširani kredencijali
Windows secures domain credentials through the Local Security Authority (LSA), supporting logon processes with security protocols like Kerberos and NTLM. A key feature of Windows is its capability to cache the last ten domain logins to ensure users can still access their computers even if the domain controller is offline—a boon for laptop users often away from their company’s network.
The number of cached logins is adjustable via a specific registry key or group policy. To view or change this setting, the following command is utilized:
reg query "HKEY_LOCAL_MACHINE\SOFTWARE\MICROSOFT\WINDOWS NT\CURRENTVERSION\WINLOGON" /v CACHEDLOGONSCOUNT
Pristup ovim keširanim akreditivima je strogo kontrolisan, i samo nalog SYSTEM ima potrebna ovlašćenja da ih pregleda. Administratori kojima je potreban pristup ovim informacijama moraju to učiniti sa privilegijama korisnika SYSTEM. Akreditivi se čuvaju na: HKEY_LOCAL_MACHINE\SECURITY\Cache
Mimikatz se može koristiti za izdvajanje ovih keširanih akreditiva koristeći komandu lsadump::cache.
Za više detalja, originalni izvor sadrži detaljne informacije.
Protected Users
Članstvo u Protected Users group uvodi nekoliko poboljšanja bezbednosti za korisnike, obezbeđujući viši nivo zaštite protiv krađe i zloupotrebe akreditiva:
- Credential Delegation (CredSSP): Čak i ako je Group Policy podešavanje za Allow delegating default credentials omogućeno, akreditivi Protected Users u plain-text formatu neće biti keširani.
- Windows Digest: Počevši od Windows 8.1 and Windows Server 2012 R2, sistem neće keširati akreditive Protected Users u plain-text formatu, bez obzira na status Windows Digest.
- NTLM: Sistem neće keširati akreditive Protected Users u plain-text obliku niti NT one-way functions (NTOWF).
- Kerberos: Za Protected Users, Kerberos autentifikacija neće generisati DES ili RC4 keys, niti će keširati akreditive u plain-text formatu ili dugoročne ključeve nakon inicijalnog dobijanja Ticket-Granting Ticket (TGT).
- Offline Sign-In: Za Protected Users se neće kreirati keširani verifikator pri prijavi ili otključavanju, što znači da offline prijava nije podržana za ove naloge.
Ove zaštite se aktiviraju u trenutku kada se korisnik koji je član Protected Users group prijavi na uređaj. To osigurava da su ključne mere bezbednosti na mestu kako bi se zaštitilo od različitih metoda kompromitovanja akreditiva.
Za detaljnije informacije, konsultujte zvaničnu dokumentaciju.
Tabela iz the docs.
| Windows Server 2003 RTM | Windows Server 2003 SP1+ |
Windows Server 2012, | Windows Server 2016 |
|---|---|---|---|
| Account Operators | Account Operators | Account Operators | Account Operators |
| Administrator | Administrator | Administrator | Administrator |
| Administrators | Administrators | Administrators | Administrators |
| Backup Operators | Backup Operators | Backup Operators | Backup Operators |
| Cert Publishers | |||
| Domain Admins | Domain Admins | Domain Admins | Domain Admins |
| Domain Controllers | Domain Controllers | Domain Controllers | Domain Controllers |
| Enterprise Admins | Enterprise Admins | Enterprise Admins | Enterprise Admins |
| Enterprise Key Admins | |||
| Key Admins | |||
| Krbtgt | Krbtgt | Krbtgt | Krbtgt |
| Print Operators | Print Operators | Print Operators | Print Operators |
| Read-only Domain Controllers | Read-only Domain Controllers | ||
| Replicator | Replicator | Replicator | Replicator |
| Schema Admins | Schema Admins | Schema Admins | Schema Admins |
| Server Operators | Server Operators | Server Operators | Server Operators |
References
- CreateProcessAsPPL – minimal PPL process launcher
- STARTUPINFOEX structure (Win32 API)
- InitializeProcThreadAttributeList (Win32 API)
- UpdateProcThreadAttribute (Win32 API)
- LSASS RunAsPPL – background and internals
Tip
Učite i vežbajte AWS Hacking:
HackTricks Training AWS Red Team Expert (ARTE)
Učite i vežbajte GCP Hacking:HackTricks Training GCP Red Team Expert (GRTE)
Učite i vežbajte Azure Hacking:
HackTricks Training Azure Red Team Expert (AzRTE)
Podržite HackTricks
- Proverite planove pretplate!
- Pridružite se 💬 Discord grupi ili telegram grupi ili pratite nas na Twitteru 🐦 @hacktricks_live.
- Podelite hakerske trikove slanjem PR-ova na HackTricks i HackTricks Cloud github repozitorijume.
 HackTricks